Yeah, plenty of that type of stuff went on in the aftermarket electronics business, I knew of many shady shops back then, some who would make key copies of the cars they worked on and go steal the stuff after selling it to them and re-sell it to other people. The guy who owned the first shop I worked for was a regional king with Audiovox back in the mid to late '70s, made massive amounts of money doing radio upgrades for many new car dealers back at the end of the 2 shaft radio days. Once the factories caught on to the money they were losing putting crap radios with no options in new cars, his business dropped off a bunch and he lost his golden boy status with Audiovox - but not long after, Audiovox came up with the Protector series products and I went to work for him in '90 when only the high end cars were coming with keyless entries and remote trunk releases, etc and he started making a ton of money again. He knew all the local car dealership owners from previous years (before the whole AutoNation and other corporate conglomerate dealership thing happened) and he'd wine and dine them, take them out deep sea fishing on his boat in Boca Grande and get agreements for all their business so I worked on almost all new cars during my time. That made things a little better, at least all the plastic parts were new and didn't shatter when taking things apart to do the work. So many stories to tell... I got to know Loren Mikesell (a technical guru for Audiovox at the time) and he taught me a few tricks including one with their 2 button transmitter PRO 9249 keyless/alarm back then. You could mod a pair of transmitters that would work both cars equipped with 9249s with reverse buttons (before the code-jumper thing started) simply by cutting a trace on the board of each transmitter and soldering a jumper in place. Button 1 would do car 1 alarm/locks and car 2 trunk, and the reverse on car 2. Fun stuff.Very cool. I always loved the retrofitting of power components like locks and hatch releases. We never did many of those in the shop but I did them on my own vehicles. The creativity like you’ve described really made it fun.
There’s a movie called “Suckers” about a shady car dealership but if that was an audio shop that could have been us. Not that we ripped people off but how unprofessional much of what I saw was. Our GM even looked and acted like the GM from the movie. Example; of course the sales guys always tried to push the high end speakers and the customers generally opted for the cheap stuff. Sometimes they’d come back because they weren’t loud enough so they’d sell them the expensive ones and charge for the install again. Then they’d plug the cheap ones into the wall and send them back as warranty claims.
How to install the app on iOS
Follow along with the video below to see how to install our site as a web app on your home screen.
Note: This feature may not be available in some browsers.
You are using an out of date browser. It may not display this or other websites correctly.
You should upgrade or use an alternative browser.
You should upgrade or use an alternative browser.
Show us something you made.
- Thread starter Shinyribs
- Start date
Ammo can stove.

RockyDS
Well-known member
Interesting idea. I'm in the middle of making a propane cylinder version.Ammo can stove.
I works well enough. The exhaust pipe for chimney makes it much heavier to transport than I would prefer but I don't use it enough to build version 2.Interesting idea. I'm in the middle of making a propane cylinder version.
Started tinkering on this fun goofball project a while back. Old CB750 exhaust, Sportster fuel tank and some other random bits.

Why did I give a dragonfly a hornet face and Sonic the Hedgehog hair? That's s good question.

A buddy came by to ride dirt bikes yesterday and helped me christen the sawmill shed.

Why did I give a dragonfly a hornet face and Sonic the Hedgehog hair? That's s good question.
A buddy came by to ride dirt bikes yesterday and helped me christen the sawmill shed.
Travist67
New member
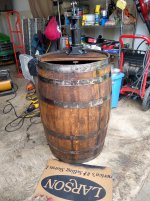
I retired in October of 2020 and here's some of the projects I've worked on since then.
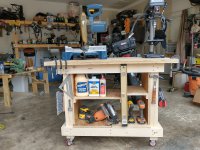
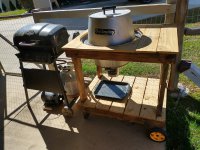
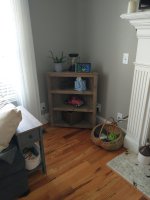
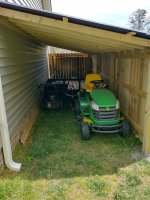
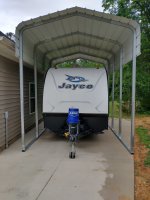
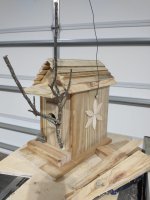
Barrel fountain using pump from Northern Tool and submersible pump from Harbor Freight. Birdhouse from 100% scrap wood. Versatube carport for camper. Lean-to using fence pickets. A couple of scroll-saw trinkets. Corner shelf for living room using fence pickets and scrap wood. Cart/table for my Old Smokey grill, and a portable workbench.
Barrel fountain using pump from Northern Tool and submersible pump from Harbor Freight. Birdhouse from 100% scrap wood. Versatube carport for camper. Lean-to using fence pickets. A couple of scroll-saw trinkets. Corner shelf for living room using fence pickets and scrap wood. Cart/table for my Old Smokey grill, and a portable workbench.
Attachments
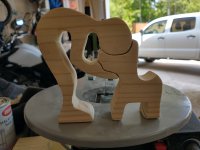
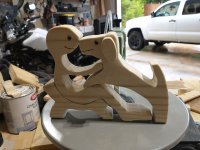
Love the silhouette cutout of the person bent over to pet the dog. That's such a cool design.
Made a thumb rest for the bass guitar. Soooo much better.


Think I just discovered my new favorite wood. That's Canary wood. Simply sanded with 600 and it looks and feels polished. There's nothing on there, not even oil.
Made a thumb rest for the bass guitar. Soooo much better.
Think I just discovered my new favorite wood. That's Canary wood. Simply sanded with 600 and it looks and feels polished. There's nothing on there, not even oil.
Last edited:
New guitar needed somewhere cool to hang. Trying something different. Chestnut oak offcut from the sawmill.

More wood turning on the metal lathe 🤦
 Masked off and sandblasted the background to raise the grain. It worked surprisingly well. Felt pads I had on hand are too thick to conform to the pegs, but it works for now. Fun little rainy day project.

It didn't break!

More wood turning on the metal lathe 🤦
It didn't break!
RockyDS
Well-known member
Just finished this knife for one of my sons. It's made from an old crescent wrench. Next job is making a sheath.
Looks a tad dark in this photo but the blade is stainless steel.

Looks a tad dark in this photo but the blade is stainless steel.
Made this atmospheric engine (Flame Licker is a common name for them) close to 20 years ago. 1" bore, 1" stroke, graphite piston, graphite valve disc (missing in this photo...managed to get it up to 1100 rpm and the little disc launched! These make very little power. The return spring for the valve looks like an ink pen spring but weaker, ink pen spring is strong enough that the engine won't stay running.

Lately I've been experimenting with some rear sight bases for Marlin lever actions, still trying to find the right look.
Lately I've been experimenting with some rear sight bases for Marlin lever actions, still trying to find the right look.
DesmoDog
Well-known member
I used to do build challenges over at a guitar forum. Since I can buy better guitars than I can build, and for less money... I'd usually do something that I couldn't just buy, or something to learn a particular detail of building.
This is a tenor sized uke Thinline Telecaster I built during a "polar vortex" in Michigan, hence the all white theme with the "snowflake" fret markers. Obvioulsy th weather changed before I took the final pictures but it was a counterpoint to all the tropical island themed ukes out there. I was going to add an igloo with a palm tree coming out of it and some other polar stuff on the pickguard but only got as far as the bear before I decided it was done. I also never installed the neck pickup or selection swith, but it's routed for it.


Here it is next to a normal size Thinline Telecaster

This is a tenor sized uke Thinline Telecaster I built during a "polar vortex" in Michigan, hence the all white theme with the "snowflake" fret markers. Obvioulsy th weather changed before I took the final pictures but it was a counterpoint to all the tropical island themed ukes out there. I was going to add an igloo with a palm tree coming out of it and some other polar stuff on the pickguard but only got as far as the bear before I decided it was done. I also never installed the neck pickup or selection swith, but it's routed for it.
Here it is next to a normal size Thinline Telecaster
Last edited:
skibum69
Well-known member
Got my new stairs in only 6 years after I started the upstairs reno. Larch milled locally from a tree in my back yard. My thought was to have the beautiful open grain as a nice contrast to the spruce floors I installed upstairs and down.
2" planks for the treads to make up the height difference with the new floors.

Not knowing anything about stairs my first thought was just to cover the old ones.

My buddy who came to help me suggested just building all new instead of covering. I got smart enough to agree.

Really happy I did as it was still a pain in the ass but at least it's level now. I didn't have enough board for risers prepped but more planks are sitting in the hall drying.

Pretty stoked on solid new stairs that don't squeak.

I really like the grain, looks great beside the spruce floor.

Last piece of the reno finally done!
2" planks for the treads to make up the height difference with the new floors.
Not knowing anything about stairs my first thought was just to cover the old ones.
My buddy who came to help me suggested just building all new instead of covering. I got smart enough to agree.
Really happy I did as it was still a pain in the ass but at least it's level now. I didn't have enough board for risers prepped but more planks are sitting in the hall drying.
Pretty stoked on solid new stairs that don't squeak.
I really like the grain, looks great beside the spruce floor.
Last piece of the reno finally done!
Dude, that's beautiful. I love the fret markers 👍I used to do build challenges over at a guitar forum. Since I can buy better guitars than I can build, and for less money... I'd usually do something that I couldn't just buy, or something to learn a particular detail of building.
This is a tenor sized uke Thinline Telecaster I built during a "polar vortex" in Michigan, hence the all white theme with the "snowflake" fret markers. Obvioulsy th weather changed before I took the final pictures but it was a counterpoint to all the tropical island themed ukes out there. I was going to add an igloo with a palm tree coming out of it and some other polar stuff on the pickguard but only got as far as the bear before I decided it was done. I also never installed the neck pickup or selection swith, but it's routed for it.
Here it is next to a normal size Thinline Telecaster
Made this table (bar?) years ago from scrap metal I got off a job. The ornamental stuff was a cage around an AC unit.
Finally got around to making stools to go with it. Poplar seat planks to match the table top. Maple feet on the stools because I didn't trust poplar not to crack up. Stool legs are old t posts.


Finally got around to making stools to go with it. Poplar seat planks to match the table top. Maple feet on the stools because I didn't trust poplar not to crack up. Stool legs are old t posts.
FASTRacing
Pant Antler
very nice !Made this table (bar?) years ago from scrap metal I got off a job. The ornamental stuff was a cage around an AC unit.
Finally got around to making stools to go with it. Poplar seat planks to match the table top. Maple feet on the stools because I didn't trust poplar not to crack up. Stool legs are old t posts.
The texture on the stool seats is a nice touch
😎
morsetaper2
Well-known member
I admire all of you w/ good woodworking skills. Some nice pieces are shown in this thread.
Rectaltronics
Active member
To quote someone earlier in this thread... now I feel very inadequate.
Naw, no need to be like that. There's some impressive (and exceptionally creative!) talent here and I'm looking forward to this being a long, fascinating and aspirational thread. I suddenly want to spend the next half of my life shopping for power and hand tools and a place to put it all.
I have a great love for thereIfixedit stuff like your phone answerer. That was very cool and reminded me of the handiwork I put in maybe forty years ago making a charging dock for an Icom 2m radio. Radio Shlock blue plastic project box, lots of cutting, nibbling and filing, a few pieces of circuit board to fashion the slot, glued into place, a roller leaf switch for activation, small transformer power supply and a constant-current design charging circuit from the pages of Radio Electronics magazine, no printed circuits anywhere, back in the day when our boffins were still trying to figure out the best TLC approach to NiCad batteries.
Running a guest house has been teaching me a lot about fixing shit, patching stuff, making shit work, fixing other folks' repairs, etc. Especially when it's in a foreign country where the culture is for someone (Korean) who doesn't know how to help to say it just can't be done. So I'm on my own here. Fukkity. And I'm in a place where people think oh I don't have a 55W FPL so I'll just put this 36W in there or I don't have a 55Wx2 ballast handy so I'll just use a couple of these 36s I brought. Or, better yet, a couple of weeks ago, I found our real estate guy, who is a retired engineer, decided replacing ballasts is for the birds and put in LED retrofits. Yay, except they were around 10cm too long so he cut the housings short and drilled holes through the circuit boards to accommodate the stud between the lamps that holds the fixture's glass. FFS. Oh, did I mention that stud happens to be a ground point?
So anyway... I'm running a villa here in Seoul. It's a five-story, seven-unit building with apartments that are mostly 100-139m² indoor space plus large balconies. The first floor is an open parking deck and an entrance lobby. The parking gets abused by the whole neighborhood (it's a Korean thing) if we don't have access controls so we were forced to install a parking bar. Which is OK except because we're cheap cork-soakers it doesn't have an intercom panel and license plate reader like many of them here do.
The folks staying here are given cheap $15 keychain remotes for the parking bar, which is fine if they're driving their own car, or a rental or whatever. And as long as they don't forget to bring it with them. Which is another issue, along with remembering the card keys for the lobby door. And they are instructed that to open the parking bar for visitors, to use the [shitty $15] remote at their window with line of sight to the parking bar. But that shit just goes in one ear and out the other, which means traffic waits while the come downstairs.
So, solutionz...
Some stuff is easy and very satisfying but hardly pic-worthy, like adding WiFi -enabled controls to our parking bar and lobby door so we can do things like say hey Siri raise the parking bar and hey Siri open the lobby door for dumbasses who forget or lose a remote or RFID card. Which beats hiding buttons and cards. Which I've seen a few cases of people (usually delivery folks) actually looking for! Easy to do if you can work a voltmeter without electrocuting yourself. Which with 220V is always a concern. Which I've found out the hard way a few times. And which the Samsung washing machine repair guy found out just two days ago while I was watching him, LOL...
Next WiFi item will be current-draw monitoring at the basement washing/dryer set to automatically turn off the dehumidier. Because pulling wire and installing a new junction box down there is gonna cost a grand.
Now for the slightly more picture-worthy bit. We wanted pushbuttons inside the apartments to reliably and easily open the parking bar. But, options to upgrade the intercom system or pull new wires would be expensive. BUT WAIT... the whole building is wired for telephones that almost NOBODY USES. Like seriously we're the only ones with a POTS line here. Even our elevator's emergency call feature is on 4G. So I decided to use those phone lines to carry the pushbutton open/close from the apartments down to the lobby deck where the telco demarcs are. OK, great. Except now is where a little thereIfixedit comes in... We don't want to have surface wires showing. Running a hidden cable around the corner of the parking/lobby area from the telco box to the parking bar is going to be expensive. So, what to do...
First I made some push buttons to plug into the wall jacks. I made eight of these (all apartments plus one for the office). Effort was taken to find water-proof low-profile buttons and unobtrusive housings. I don't have a workshop here, or a drill press, or a good selection of bits, the coffee table and an old shelf is my bench. A small pilot hole and then a Japanese step bit does the work on this piece. The last one or two size gradiations for the button's hole are done by turning the part on the bit, LOL. That helps me use body english to keep the step bit on-target and avoid bloody fingers.
No, I didn't leave the strain relief like that. That was a failed hot glue experiment. I would up just tying a tight knot in the phone cable.
Button installed on a kitchen backsplash. Some have the buttons velcro'd to the WiFi routers instead. Just different patching in the punch-down block in the apartment.
And now for the wireless magic downstairs (LOL):
There are four telco pairs going up to each apartment so I settled on using the second pair for the parking bar pushbuttons, just because. So there's the orange/white pair joining them all up semi-artfully through the 1st floor punch-down block (that's the demarc on the left) and then going through a molex quick-disconnect (if troubleshooting required), then soldered to a button connection in the remote.
Oh, and the remote is hung off a hook that way because if I velcro it to the back of the box it won't work. Probably standing waves or some undesired grounding effect from being too close to the metal behind.
.
Nice work and workarounds too, genius using the otherwise useless hard phone lines.Naw, no need to be like that. There's some impressive (and exceptionally creative!) talent here and I'm looking forward to this being a long, fascinating and aspirational thread. I suddenly want to spend the next half of my life shopping for power and hand tools and a place to put it all.
I have a great love for thereIfixedit stuff like your phone answerer. That was very cool and reminded me of the handiwork I put in maybe forty years ago making a charging dock for an Icom 2m radio. Radio Shlock blue plastic project box, lots of cutting, nibbling and filing, a few pieces of circuit board to fashion the slot, glued into place, a roller leaf switch for activation, small transformer power supply and a constant-current design charging circuit from the pages of Radio Electronics magazine, no printed circuits anywhere, back in the day when our boffins were still trying to figure out the best TLC approach to NiCad batteries.
Running a guest house has been teaching me a lot about fixing shit, patching stuff, making shit work, fixing other folks' repairs, etc. Especially when it's in a foreign country where the culture is for someone (Korean) who doesn't know how to help to say it just can't be done. So I'm on my own here. Fukkity. And I'm in a place where people think oh I don't have a 55W FPL so I'll just put this 36W in there or I don't have a 55Wx2 ballast handy so I'll just use a couple of these 36s I brought. Or, better yet, a couple of weeks ago, I found our real estate guy, who is a retired engineer, decided replacing ballasts is for the birds and put in LED retrofits. Yay, except they were around 10cm too long so he cut the housings short and drilled holes through the circuit boards to accommodate the stud between the lamps that holds the fixture's glass. FFS. Oh, did I mention that stud happens to be a ground point?
So anyway... I'm running a villa here in Seoul. It's a five-story, seven-unit building with apartments that are mostly 100-139m² indoor space plus large balconies. The first floor is an open parking deck and an entrance lobby. The parking gets abused by the whole neighborhood (it's a Korean thing) if we don't have access controls so we were forced to install a parking bar. Which is OK except because we're cheap cork-soakers it doesn't have an intercom panel and license plate reader like many of them here do.
The folks staying here are given cheap $15 keychain remotes for the parking bar, which is fine if they're driving their own car, or a rental or whatever. And as long as they don't forget to bring it with them. Which is another issue, along with remembering the card keys for the lobby door. And they are instructed that to open the parking bar for visitors, to use the [shitty $15] remote at their window with line of sight to the parking bar. But that shit just goes in one ear and out the other, which means traffic waits while the come downstairs.
So, solutionz...
Some stuff is easy and very satisfying but hardly pic-worthy, like adding WiFi -enabled controls to our parking bar and lobby door so we can do things like say hey Siri raise the parking bar and hey Siri open the lobby door for dumbasses who forget or lose a remote or RFID card. Which beats hiding buttons and cards. Which I've seen a few cases of people (usually delivery folks) actually looking for! Easy to do if you can work a voltmeter without electrocuting yourself. Which with 220V is always a concern. Which I've found out the hard way a few times. And which the Samsung washing machine repair guy found out just two days ago while I was watching him, LOL...
Next WiFi item will be current-draw monitoring at the basement washing/dryer set to automatically turn off the dehumidier. Because pulling wire and installing a new junction box down there is gonna cost a grand.
Now for the slightly more picture-worthy bit. We wanted pushbuttons inside the apartments to reliably and easily open the parking bar. But, options to upgrade the intercom system or pull new wires would be expensive. BUT WAIT... the whole building is wired for telephones that almost NOBODY USES. Like seriously we're the only ones with a POTS line here. Even our elevator's emergency call feature is on 4G. So I decided to use those phone lines to carry the pushbutton open/close from the apartments down to the lobby deck where the telco demarcs are. OK, great. Except now is where a little thereIfixedit comes in... We don't want to have surface wires showing. Running a hidden cable around the corner of the parking/lobby area from the telco box to the parking bar is going to be expensive. So, what to do...
First I made some push buttons to plug into the wall jacks. I made eight of these (all apartments plus one for the office). Effort was taken to find water-proof low-profile buttons and unobtrusive housings. I don't have a workshop here, or a drill press, or a good selection of bits, the coffee table and an old shelf is my bench. A small pilot hole and then a Japanese step bit does the work on this piece. The last one or two size gradiations for the button's hole are done by turning the part on the bit, LOL. That helps me use body english to keep the step bit on-target and avoid bloody fingers.


No, I didn't leave the strain relief like that. That was a failed hot glue experiment. I would up just tying a tight knot in the phone cable.

Button installed on a kitchen backsplash. Some have the buttons velcro'd to the WiFi routers instead. Just different patching in the punch-down block in the apartment.

And now for the wireless magic downstairs (LOL):

There are four telco pairs going up to each apartment so I settled on using the second pair for the parking bar pushbuttons, just because. So there's the orange/white pair joining them all up semi-artfully through the 1st floor punch-down block (that's the demarc on the left) and then going through a molex quick-disconnect (if troubleshooting required), then soldered to a button connection in the remote.
Oh, and the remote is hung off a hook that way because if I velcro it to the back of the box it won't work. Probably standing waves or some undesired grounding effect from being too close to the metal behind.
.
I appreciate the kind words about my little gadget, it was dun to make and even more fun to use at the office. People would walk up to my desk and start talking to me when I was on the phone and I'd point to the flashing LED on the box, then to my ear where the bluetooth earpiece was.
I've always been creative like that, I got it from watching my father figure out stuff and make stuff when I was a kid. When I got a really nice used '84 Monte Carlo SS in 1994 I wanted to deck it out with all the goodies I could put in it from the accessories shop I worked at doing installations. Built my own 5th order box to get a lot out of a single 8" sub, scrounged together a nice 100w amp and a Ford (Sony) 10 disc changer with wired remote, but it ran off its own set of RCAs so I had to figure out how to have 2 separate inputs for my Pioneer KP-7500 deck.
We had an old retail deck and speaker display that had push-button switching between decks and speaker sets for test listening, and I discovered it had multi-terminal relays inside it, perfect for what I needed. I took one relay, soldered 2 sets of RCAs to the inputs and outputs, then connected the trigger lead to the power antenna output of my deck so when the radio was on it used its own set of RCSs and when I turned it off it switched to the RCSs coming from the 10 disc, both using the same amp and speakers.
Then I wanted to put remote start on the car. Bought the module to add into my full alarm with 2 sirens, fully taped into the harnesses under the dash to try to conceal things best I could, but I had people telling me I couldn't put a remote start on a carbureted engine. I used a trunk release solenoid bolted to the throttle bracket, hardware bits from one of our aftermarket cruise control kits to connect it to the linkage, and an adjustable timer and set it up to pull the throttle to about 1800 rpm to either clear the manifold when it was hot or set the choke when it was cold, then drop back to idle after 6 seconds. I added a window roll-up module that rolled the windows down when you disarmed so you could let out the midday heat, then hit the remote start and it rolled up the windows, triggered the throttle solenoid, fired up the engine and cooled the car off with the a/c setting you left it at when you shut it off. I also added a second keyless module for an additional channel so I could do a "remote valet" after rolling the windows down because I set the alarm arming to passive so it would lock itself after you walked away (and roll the windows up with lock/arm if you didn't previously).
So yeah, I love that kind of stuff, it's as much fun as it is rewarding for the job needs when someone does something like you did for that gate and door.
Rectaltronics
Active member
Thanks!Nice work and workarounds too, genius using the otherwise useless hard phone lines.
I like how you think.then connected the trigger lead to the power antenna output of my deck so when the radio was on it used its own set of RCSs and when I turned it off it switched to the RCSs coming from the 10 disc, both using the same amp and speakers.

.