What's new

What have you 3D printed today.

Cripes, am I the only one posting here???

I decided to go with pod filters on my 900ss track bike. That of course means the airbox goes, which means the coil mount loses it's mounting place and the battery loses it's box. It also means the front tire now has a direct line of fire to the air filters.

I thought I'd make a plate to block the tire stuff, and then figured why not mount the coils there too? The rear of it bolts to the airbox mounts, the front of it zip ties to a frame tube.

I also ordered a Shindengen SH847 regulator for it. I don't have it in hand yet to figure out where to put it, but it won't fit where the stock one goes... I suppose I could put it here instead, but I'm not sure if it will need to be in direct airflow? Current plan is to mount it where the headlight used to be. If it needs direct airflow, I can put a couple slots in the fairing like the stock bikes have...

CoilMount_7543.JPG
CoilMount_7538.JPG
CoilMount.jpg
CoilMount_7540.JPG
 
Come on people, there's gotta be more fools around here wasting incredible amounts of time on parts they could have bent up out of sheet metal in an hour or two.

Here's the "final" version of the battery box that goes with those coil mounts. It's printed in PLA here just for mock up. The strap will be changed too, that one is just something I had sitting around.
BattBox_7571.JPG


BattBox_7585.JPG
 
I'll have to take some pics...we got a new Bambu Labs X-1 Carbon ($1599) a few weeks back. It's the fastest one I've seen and a HUGE step above our old "professional model" Stratasys that cost $28k!

The students tend to make trinkets in between classes and such but I'm trying to show them the usefulness in making fixtures for things that can't be held by hand during measurement, etc.

I also made a fixture to hold a tapered bar end weight I made. My Barkbusters came with fairly light bar end weights and I picked up some vibes.

I counterbored a hole in the back end of the part and cut a 3/4" wide slot .300 deep in it (.050 deep cuts at a time) while holding in the PLA fixture. I wasn't sure if it would hold or not, but it did...once. I put the 2nd one in the fixture and it rotated about .200 deep and hosed the slot. So I am using a few drops of superglue on the next version.

IMG_7518.jpg
 
The discussion in here about jigs made a lightbulb go off this weekend. I needed to cut some holes in a thick part of the chassis of my buddy’s lawn mower. The typical thing is to try to make it out of cardboard. But we all know it’s impossible to make a round hole in that. Instead I printed a stencil to use as a plasma torch cutting guide. It worked pretty well—the holes are slightly jagged since I was going too fast to keep from melting the plastic. The stencil seemed to survive better when I went slower, actually—less slag blowback from an incomplete cut. Anyway, I’ll do this again in the future—you can tweak the hole size easily. And it’s so easy to draw up simple 2D shapes that it’s less effort than being accurate with a wood stencil or whatever.

IMG_7499.jpeg
 
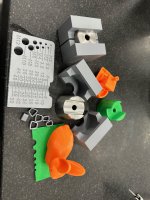
As mentioned here are the fixtures I made to hold steel for milling, along with some other doo-dads. The orange items are off of a Creality Ender 3 v2 Neo that we received last week for $179 (matterhackers.com). They may be available for less but Mattterhackers will work with schools/Purchase orders and the like.
IMG_7652.jpg
All the gray and green stuff came from the Bambu Labs X1 Carbon. If you want to print and don't want to fudge with the machine to get it just right, the X1 Carbon is a winner. I've never seen one work so seamlessly straight from the box, not to mention it's fast. I am not sure if you can get much faster and have time for the layers to set on small models. I printed a model last week that took 4 hours, the same model printed on the Ender 3 was estimated at 23.5 hours. It also detects changes in it's own vibrations (such as a table shaking) and can pause and ask you to inspect the machine. Due to its speed and higher output fan the Bambu is noisy compared to most others but we have it on the cleaner end of the main machine shop so it isn't really noticed.

At $179 each, you can buy 8 Ender 3 units for the same price as the Bambu X1 Carbon...but you need 6 of them just to match its output. It's the unit I'd buy for personal use if I were buying one tomorrow. I bought the 2 Creality units to transport to high schools and for a Maker's camp thing we are doing next summer for younger kids.

Here's a quick video to show how quickly it moves and how noisy it is. It was the only machine running in the shop during the video.
 
I just bought similar printer, a Creality K1 Max. Larger build volume than the X1 Carbon bit it's turning out to be a finicky little bitch to get to run right.

The first print went ok but broke the first couple layers when I took it off the sheet. Then I noticed it had black filament mixed in with the white I was using - so I wrote it off as one of those things. The other layers were tough enough I can't break them by hand, even the small stack on top of the Benchy. The black had to be from a factory check or something, the machine was obviously new and I've heard of that happening before.

So yeah, if my 15 minute print worked fine why not jump into a 4.5 hour print (more like 13 hour on my old printer)? 4 hours in it clogged, which wasn't as big a deal as you'd think since it was a test part and all the important features had printed. I thought I knew what was going wrong. Simple fix, it's been reported, I just didn't do it first.

Took the opportunity to put in a larger nozzle since that's what I normally use.

Could NOT get the damn thing to work right after that. NO layer adhesion, parts were ridiculously fragile. Nothing was helping. So eventually I put another new nozzle on it.

And back to strong prints. Brand new nozzle was somehow screwing up, must be partially clogged/flawed from the factory? I dunno. In any case, I took the opportunity to order an upgraded hot end for it, mainly because the new hot end will use the same type of nozzles my old printer does. I had issues with clogging on that one, bought a bunch of nozzles. Never had a clog again (knock wood). Point being I've got nozzles around here already, they just don't fit the stock hot end.

FWIW the new hot end cost around $30 delivered. One nozzle can cost that much so it was kind of a no brainer to me.

ANYWHOS... Today I'm probably going to try to print nylon on it for the first time. But first, another 4 hour print... truth be told I'm not 100% confident in the new printer yet. Shows great potential but it may still need more dialing in.

Here's the first print right out of the box. To someone used to an old school printer, this looked like witchcraft. No, the video is not sped up.


EDIT: Oh, forgot about this. After getting it printing again I tried another mock up hours-long part. Looked at the filament roll and thought that oughta do it. Turns out it was THIS close! And dont worry about the flaws in the design, I was trying something different late at night and it didn't work.


IMG_7613.JPG
 
Last edited:
Strike that - redesigned it once again.

I put the coils on the bottom then moved the battery over so I could put the ignitors next to it. I have some NylonX filament I was going to use, but I ended up printing one out of ASA and am going to run with that.

BattBox_7650.JPG


BattBox_7656.JPG


I started out making a box to hold just the battery. Then added bolt on braces to that. Then made it all one piece. Then added the coils and ignitors.

All it took was a new printer and about two rolls of filament spent pumping out mock up parts. The good news is, the first few versions turned out a little more flexible than I expected. This version is tough enough I'm pretty sure you could use it to lift the bike.
 
So the hugger I bought for the trackbike doesn't fit wihtout mods that I don't want to make. I thought I'd run without one but then it occurred to me the new printer is bigger than the old one. One thing led to another.

Hugger_7728.jpg

Got the bolt pattern down.

Hugger_8664.jpg

I had to take the picture in a shaded area - that one is only 0.6mm thick and bright light goes through it...

The real one will take about 5.5 hours to print. Should I use the cheap stuff first to make sure it's going to work, or just jump right into the good stuff? I'm kidding, I've learned my lesson about thinking I know what I'm doing.
 
More 3d printed stuff, and it's not for the fooking battery box! I have literally gone through multiple rolls of filament printing battery boxes. It's not even for that bike!

There is a thread here on a unit to add Apple Car Play to your bike. I'm a huge fan of Apple Car Play and for under $100 I figured why not give it a shot. It showed up yesterday and one thing I didn't like was the mount. So, I printed a RAM ball to bolt on the stock mount. Well I printed three of them actually but that's beside the point. Par for the course really, I rarely get it right the first time, I always think of somethign I want to change, before the print is even done.

I was going to print the entire part in one piece but then discovered the stock mount has an anti-vibration feature that may or may not work. Plus, I'd probably run a bolt through the center of the ball anyway since the orientation of the layer lines is not ideal there. I'm using carbon fiber infused PETG and I really doubt layer seperation will be an issue, but bolts are cheap and the holes for them even cheaper, so what the heck. Anyway, it was easier/faster just to draw up and print the ball.

I stuffed Nylock into the hole they had for the typical POS hardware that was included. Now to order the 5 x 40 bolt it needs to finsih it off.

CarPlay_7818.jpg


CarPlay_7819.jpg
 
Is there any way of recycling old prints? I can't imagine it's feasible/economical to extrude old prints in to new rolls of filament, but surely there's some sort of trick?
 
Is there any way of recycling old prints? I can't imagine it's feasible/economical to extrude old prints in to new rolls of filament, but surely there's some sort of trick?
There are some machines available to do it but not really cost effective on a personal scale. There are also some plans to DIY a machine to do it, from what I can tell the success rate is good IF you can get the scrapped prints and other debris separated and ground to a consistent size.

Same guy with an updated machine and video:
 
I did think about a rib along the top, but that goes back to when I wanted to use ribbed fenders and a ribbed gas tank, which I'm not using, so I didn't add it.

I've posted a couple things on Thingiverse, it's a pretty horrible site (lots of issues posting things, at least there were last year) but they have a lot of stuff to search for. I've found a few useful motorcycle objects on there.

I've moved on from this for now and printed out a couple chain guards, When I Was on my 3rd iteration I discovered I can't mount a full chain guard if the fender and chain are already in place. That's not all that helpful so I'll be changing to a two piece guard.

But in the meantime I did up a fake oil tank so I'd have somewhere to hide a breather valve/filter. Turns out it doesn't look like I hoped it would so back to the drawing board.

Someone on another forum asked about videos of prints. I'm not really set up to do timelapse stuff but I turned the feature on and came up with this. Yep, it's a cylinder. Massive excitmeent here, let me tell ya! though making the timelapse consists of my clicking on a digital toggle so no big effort to me anyway...


:lol2 I like the video with the little figures wandering around.
 
For such a big bike, my new to me Multistrada has surprisingly few choices for mounting stuff up front, especially if a tank bag is in place. If you aren't blocking the dash you're smacking the screen and/or tank bag when the bars turn. So I made up a RAM mount for the mirror stalk.

Mounts_7874.jpg


That'd be one base with two top pieces. Everything is laid out in the orientation it was printed in. One of them has a bolt on ball, advantage being the bolt holds the layers togther. The ohter top is all one pices, advantage being, um, it's all one piece. But the ball hasn't got anything other than plastic holding it together. But the layers are oriented in a way that it shouldn't be an issue.

Give me a break it, it snowed last night so I'm hanging around the house doing stupid stuff like modeling RAM mounts for a Multistrada...

Now maybe I'll buy a 360 degree camera so I have something to put on my new mirror stalk RAM mount.
Looks good!

I bought a Insta 360 last year. While it's amazing to be able to see 360 degrees the battery life is pretty disappointing.
 
I mounted the mount and posted the files on thingiverse.

It's meant to be a cam mount but I couldn't find my GoPro, so my POS Tomtom filled in for the glamour shots. (I detest that thing with a passion, hence the Apple Carplay mounted above the dash). No, I don't intend on running three screens.

MultiMount_9030.jpg


https://www.thingiverse.com/thing:6531560


I also got sick of looking at the beat up dash on my trackbike, so I printed a simple cover.

Dash_9039.jpg


Dash_9040.jpg


The thing is, I'm pretty sure I deleted the wiring to any idiot lights, so that nasty looking panel is useless... there will likely be more changes before it's done.
 
Top Bottom Back Refresh