What's new

Husqvarna 701 (KTM 690) Enduro (Dual Sport) Project Bike - Technical Thread

CLUTCH & TRANSMISSION
Just got notification from Lyndon Poskitt in Scotland that my wide-ratio transmission shipped (or rather, will be shipped). The gearsets are available on backorder, as in build to order. I've been waiting quite some time...

Yikes. My wife will soon see the Rekluse auto clutch AND the tranny on the credit card in the same month!

Gonna have to hold off on buying the suspension bits....


My wife would shoot me .... £2,350.00
 
REKLUSE EXP-BASED AUTO CLUTCH
RMS-6385F-RADIUSX CLUTCH (there is no 'F' in the part number on the box) arrived yesterday! This pricey device pretty much eliminates the classic 'thud stall' of manual clutch bikes. No matter your skill level you will eventually make a mistake and stall. On a trials bike the resulting risks are lower even though by appearances who in their right mind would risk trials competition? But the risk is actually much higher on the bigger bikes. Not only are the engines (most of them anyway) more 'thoroughbred' as in lighter in the flywheel, the tall seat and added weight pose risks of their own. For me as a trials rider I have the added risk of being so heavily programmed to nuance the throttle while using a manual clutch. I stalled my Beta 390 a bunch of times. Twice with injuries.

I was chicken over putting a perceived 'weenie rider' auto clutch on the Beta (and at the time a $900 CX model item), so I first put one on the KLR.

If I screwed up the KLR and did not like the auto clutch, well, it was 'just' a KLR! That Rekluse Radius X auto clutch worked well on the KLR. I immediately learned, however, that a manual clutch on top of an auto clutch work weird. On bikes with decent torque response with the throttle, I found you just don't need a manual clutch on top of an auto clutch. The KLR, being a cable clutch bike, presented an additional problem.

Older version of the Rekluse auto clutch with multiple slung balls to clamp the clutch pack and some of other brands using balls set the internal dead engine and idle clearance INSIDE the clutch itself, so an override clutch, though it may feel different, at least feels less weird. The latest design of Rekluse sets the internal dead engine and idle clearance, which they call "installed gap" external to the clutch. That works like pulling a manual clutch in and holding it in steady right at the release point. The only way to do that is with the clutch actuation, and there are two types, hydraulic and cable. Rekluse provides their own excellent slave cylinder for all hydraulic clutch models. These have a backstop screw for the slave piston and thus also the clutch actuation rod that contacts a ball pressed into the piston. The ectrenal part of the adjuster is here in red:
Rekluse Slave Backstop Adjustment.jpg

You can precisely set the clutch clearance without perturbations from external influences.

Not so on cable clutch models!

To keep that stupid simple and go along with the market's perception that eliminating some manual clutch capability is going too far, the sensitive adjustment is done by tensioning up the clutch cable to where the clutch lever is full out and quite stiff to pull in. The problem, aside from a very weird feeling manual override, as the lever will want to push out when the RPM is rising. That is due to the EXP pack in the clutch expanding axially with RPM increase from idle. Cable clutches introduce the variables of thermal expansion and contraction and differences from Bowden sheath bending when steering away from the center toward the steering stops. That led me to tail chasing the adjustment. I almost tossed the whole auto clutch idea.

But not needing an override clutch brought a simplification of tossing all the manual cable clutch except the last few inches down near the clutch. I kept the adjuster end and brazed the cable to a doodad that fit in the end of the adjuster:
KLR Cable Adjuster.jpg

That gained me consistent operation and set it and leave it. Then rides confirmed the benefits of the auto clutch and led to the conclusion that I could use the left hand ergonomic space for the rear brake. I worried at first that a hand brake would not be strong enough, but it was, no issues, even one finger, using a Brembo 10mm DOT 4 clutch master cylinder from a KTM ($75 used on eBay), and my custom spec Speigler brake line direct to the Tokico rear caliper:
LHRB Spiegler Line Order KLR.JPG

EL-1940-002-511 means style EL, 1940mm long, 10mm banjo fitting 002 and M10X1.0 threaded fitting 511. Color option I chose was black line with clear anodize aluminum fittings.

The later Beta conversion went off without a hitch as it was hydraulic, at first with the stock Brembo 10mm master cylinder, the I got a 9mm to better match the smallish Nissin rear caliper. I gave the 10mm to a friend when converting his bike similarly.

And now I'm at the 701 conversion, a bigger Brembo rear caliper, and once again a 10mm Brembo, only this time new, as I found a rare good price for one of $125.

That's happening now - hopefully without distractions. If I'm lucky, the primary cover gasket won't tear and then adhere it to the primary cover and then grease the center case contact side for a permanent reusable primary cover gasket. If it tears I'll have to wait on a new gasket :-(

I better first watch the Rekluse install video again on YouTube....
 
The more I work on this LC4-based bike, the more I'm impressed with the design prowess. Lots of emphasis on weight reduction (though the 701 is still a chunk). See here aluminum parts on the shift drum. I've never seen (or noticed) this before.
IMG_8872.jpeg


Lots of fine attention to detail every where, like the atypical separation of the primary cover from coolant passages (thank you).
IMG_8871.jpeg

The only things 'attached' to the primary cover are the shift sensor (two screws to remove), and the oil filter and oil pressure sender unit (two screws to remove). And thank God the gasket stayed entirely with the cover.

I get a chuckle watching videos of people dutifully replacing every single gasket and o-ring and filter every time they work on a bike. I'm like WTH! Those parts (mostly) are good for decades, so why the heck are this replace every time you touch it emphasis?
 
STOCK & REKLUSE CLUTCH - Up to Rekluse plates assembled into the clutch

What a weird and interesting clutch this Italian Adler design is! I misunderstood it. A conventional wet moto clutch is drive basket (for the fiber plates) and driven hub (for the metal plates). This is a pressure plate that accepts the springs. The Adler clutch adds parts. The drive basket is conventional, but the inner driven hub on the transmission shaft does not accept the metal plates, it has angled slots that accept angled tangs on an intermediary floating hub that accepts the metal plates. The intermediary part has four "anti-judder" springs pushing back against it from the fastened inner hub, and it doubles as the pressure plate. The pressure plate, unlike a conventional helical coil springs clutch, does not have the spring seats and throw-out (TO) bearing. On the later Adler clutches those functions are in two separate parts, whereas with the older, 'pre-slipper' version, it is one separate part.

Here are the two TO and springs retainer parts. These are the first parts to remove to get at the plates:
Spring Retainer and TO Bearing.jpg

Once removed you see the following, the nut-fastened inner hub, the four anti-judder springs, and the combo pressure plate and steel plates floating driven hub:

Pressure Plate.jpg

In the above photo you can see the angled slots peeking out of the inner hub, and the angled tangs of the intermediary hub/pressure plate. The two cap screws are supplied by Rekluse for hand tightening, to holding things together against the force of the four anti-judder springs.

Notable are the MANY slots and holes to sling oil outward then through the clutch pack to promote the dynamic plates float required for excellent slip-engage behavior.

Next the stock KTM clutch pack all zip tied together, oriented top-down is out-in, to make darned sure all the parts are correctly ordered. This pack will go in a gallon plastic bag with notes, to later put back in the bike if if I sell it and get another 701. I usually keep bikes a long time, as a long term relationship and because my bikes get heavily tweaked. That takes a lot of time, and once ever so sweet, they are very hard to let go of. I somewhat envy people who can live with stock bikes and just buy a new one and do relatively little work and just go ride. Not me!

More about the stock setup:
Conventional except for the first fiber plate, which has a larger inside diameter. Inside that are a hardened steel Belleville spring and hardened steel backer washer. The Belleville spring gets sandwiched between the backer washer (top below) and the first metal plate in the next photo. The Belleville spring and oddball fiber plate are the 'slipper' function. Earlier KTM 690s do not have this extra feature:
Stock Clutch Pack Out-to-In.jpg

Next the floating hub/pressure plate pulled out showing how the backer washer and Belleville spring properly oriented. Belleville springs should never rest against aluminum, which is why there is the backer washer:
Pressure Plate-Hub.jpg


And next, the intermediary hub pulled out, revealing the contact witness of the outer edge of the Belleville spring on the first metal plate. The area of that plate outside the contact ring is the contact surface for the one oddball fiber plate. When there is no spring clamping force on the clutch pack, the Belleville spring does not allow the oddball plate to contact, and there is significant clearance:
First Steel Plate In.jpg

I don't get how one little plate can do any significant 'slipper' function. The Rekluse clutch setup eliminates the Adler slipper function. A loss? Nope. The entire Rekluse auto clutch pack is an RPM-controlled slipper clutch. The 'slipper' function with the Rekluse is massive compared to the Adler.

Before starting the work, I reviewed the 8-year-old install video by Rekluse into a 690. Getting at the clutch was really easy! Just remove the foot peg mount and push it off to the side, then remove the shifter sensor and push it off to the side. Remove the cover screws and delicately ensure the gasket stays with the cover side. NO messing with a water pump or draining coolant! Here's their video:


In that you can see the Adler pre-slipper revision. Note that I was able to assemble the Rekluse clutch WITHOUT removing the clutch hub nut and inner hub as they did. I inserted the plates assembled on the intermediary hub, taking care to clock the hubs, floating hub arrow-to-inner hub slot. With the plate in, I then pulled the floating hub out a bit to then insert the four anti-judder springs before fitting the clamping springs and TO bearing-related parts.

Another change to the video above was the later versions of the Rekluse clutch comes with four new clamping springs. They are stiffer springs than stock, having k=

Stock clutch springs:
Stock Clutch Spring.jpg


Rekluse-provided clutch springs:
Rekluse Clutch Spring.jpg


Apparently they were having some slip/heat/wear issues with the stock springs, so they upped the constant, k. You can see that difference in the clamping 'force total preloaded' between the two springs.

The spring preload entries aren't the whole picture, however, as the Rekluse pack varies in height by RPM due to the contracted and expanded EXP sub-pack. Dead engine and idling the set clearance will float the plates. Then just above idle the EXP sub pack will expand and start clamping the plates together against the resilient backing of the clutch springs.

The total stack-up heights of the stock and Rekluse plates:

Stock: 1.268"
Rekluse, EXP subpack collapsed: 1.247"

So the stiffer clutch springs start out at a little less preload, then the expansion of the EXP subpack pushes the pressure plate into the springs. How much the subpack expands when the weights are slung all the way out from 'centrifugal' (really tangential) force is unknown to me. The six weights they used in the EXP 3.0 subpack for the 701 are marked on the weights as 11B, which the parts sheet says is the EXP WEDGE ASSEMBLY (meaning 6 weights)- H450 - Heavy. The weights look to me like sintered bronze.

I stuck with their as-shipped EXP springs. On other bikes the weights and springs they have shipped with have been right enough to not get into tail chasing with weights and springs.

Full reassembly and testing will have to wait a day, as I'm off to do some water-well-related work.
 
Last edited:
What was on my front step today at $339 a pound?
IMG_8904.jpeg

That's right. A Nova Racing wide ratio gearbox fresh from Lyndon Poskitt in Scotland.

I've never done anything quite so extravagant.

I'm hoping the design (how it feels to shift it) is as good as the apparant - appearance - build quality, which is exceptionally high!

Zoom on in....
IMG_8901.jpeg

Now to get the set INSIDE the center cases. Complete teardown required. A perverse idea of fun.
 
All in, I paid $30/ pound for fish last week in Alaska. Halibut, kings, rockfish.

We only shipped 250# home, but had a great time...
PXL_20230603_012959182~2.jpg

Worth every penny,

just like you will enjoy that gearset for years to come....
 
EXP 3.0 DETAILS
The EXP 3.0 subpack is a very interesting and innovative solution to auto clutches. From a manufacturing perspective the new way is simpler, such as with the Radius X versions that use the stock clutch pressure plate and hub. The older style required more custom machined parts in hard coated aluminum because you had to have machined slots for 'sling' balls in two parts that

Some say the older style Rekluse using balls promotes a better feel. I set up one of those a few years back when the rider was threatening to remove it for the conventional clutch on his WR450F. I asked to be given a chance to tune it first and after that the rider really liked the auto clutch. It took almost a year after that to convince him on losing the clutch lever and foot brake as well, but he eventually did and likes the whole system a lot. We'll see, but this older WR450F seems top be a keeper bike for him. That's significant because his habit is to just up and one day decide to sell bike, even if he later regrets doing so. I made his 2005 WR450F quite custom in the clutch and controls and suspension, and well, we shall see.

The issue with his ball style Rekluse auto clutch, as it came in a bike from a friend, was hysteresis response to throttling up and shutting off. Specifically, a delayed engagement and early release with respect to RPM. I was riding with this rider on some technical single track and watched him struggle with and curse at a herky-jerky response. There was the stall prevention, but the bike was harder for him to ride than with a 'normal' clutch.

That particular clutch has an internal adjustment for dead engine and idle clearance. I changed that and swapped a thicker fiber plate for a thinner one. I reduced the clearance so that any throttle would immediately engage the clutch, resiliently of course, and as a result, the clutch would stay hooked up until idle, so the engine braking was very predictable. When set up thus, an pull of the bike at all during decelerating or riding downslope will keep the engine hooked up, and the only thing that will release the clutch is slowing way down or forcing that with the brakes.

On that older style clutch the rpm slip zone is broader than the new style EXP 3.0 style. Some riders like the old way better. The new way I think feels more like a normal clutch.

Note this video is of a radius CX model (a Rekluse hard coated aluminum clutch hub is also provided - it's on the table on the right). No change in how the system works or is adjusted. I think their clutch hub, having a much higher surface hardness, may allow the metal plates to slide easier to go into float. Also, there will be less grooving over time from contact pressure. The 701 uses the Radius X model, using the stock clutch hub. Here's a Rekluse video on slip/drag/engagement and ways to adjust those. Looks like I'll be trying their 'free-play gain' trick again in the early setup to see if it will prove more useful to me this time.


Here's a guy on a 350 figuring out how to raise the idle to reduce 'flameouts' and be able to move the engagement point up to match the higher idle.


One other detail. For an EXP-based clutch to work and still have enough fiber and metal plates, the fiber plates especially are much thinner, and have a steel plate cores. Conventional clutch plates are typically fiver bonded to thicker aluminum. The thinner plates are why the kits come with very precisely made stainless steel sheet metal 'basket sleeves' steel on steel between fiber plates and basket. Otherwise the small surface area of contact would result in high pressures and earlier grooving wear. The steel on steel also reduces lateral stickiness to help oil float the plates when the clutch releases.
Rekluse Basket Sleeves.jpg
 
All in, I paid $30/ pound for fish last week in Alaska. Halibut, kings, rockfish.

We only shipped 250# home, but had a great time...

Worth every penny,

just like you will enjoy that gearset for years to come....

That's awesome! And funny, thanks! I guess 10X plus more for machined, hobbed, normalized, quenched, tempered, carburized, polished, marked, assembled, and shipped steel is justified :-)

And such an expenditure to address a long-term personal pet peeve of getting pissed about narrow-ratio-spread gearboxes! It is satisfying, however, a kind of, "Take that!"

Had the AJP PR7 come with the wide ratio gearbox from the get-go, TE-610 and SWM Super Dual set, as it SHOULD have, damnit! ...I might be on an AJP PR7 today.

The whole wide-ratio gearset from SWM is MUCH cheaper, as in only $800, under one part number. But it wouldn't be the set of jewels the Nova Racing set is. The lack of a ready-to-buy Rekluse auto clutch for the AJP's 600 Husky motor (and other considerations) swayed me to the weirdo KTM design as "years to come" (my typical 10 years for a bike). I'd be 77 by year 10 and maybe still alive and healthy enough to ride! That of course assumes the ability to ride, which is 'normal', survives Orwellian BAT SHIT CRAZY.
 
REKLUSE INSTALLED
Got to here an hour ago:
Rekluse Installed.jpg


Finishing the install took me hours, as I was doing everything very carefully. Following the 'assume nothing' rule, I measured the free length of the stock clutch springs. They were all within a 0.002" of variance. Good quality control! The Rekluse springs, however, a a length difference between the shortest and longest of a whopping 0.022"!
Rekluse Clutch Springs Length Problem.jpg

At 255 ponds per inch that's a difference of 255 X 0.022 = 5.6 pounds.

Would that cock the pressure plate? Maybe not, but I sanded the the ends of the 2nd and 4th longest springs to equal that of the 1st and 3rd longest lengths to make two matching-length sets to place opposite each other. Shortening the longest and the next two to the shortest was way too much work! They were installed balancing other:
Rekluse Clutch Springs Length Resolution.jpg

(Actually the bottom spring was 1.333).

With plates installed, I pushed on the pressure plate and found the stock slave cylinder was standing the pressure plate off the clutch plates. So I removed the stock slave cylinder and installed the Rekluse slave cylinder, backing off on the Rekluse adjust screw. Then I tightened the clutch springs. The in with the adjust screw until I had about 0.03" of pressure plate stand-off.

Buttoned everything up then filled up with Rotella 5-40 T6, a synthetic oil of the required JASO MA oil spec, which includes wet clutch friction additives. Further adjusting, testing, and break-in are next.
 
Last edited:
Sorry for the irritating GIF, but that's exactly how I feel after fresh testing of my third Rekluse auto clutch install!

200.gif
Oh yeah, baby!

I attribute the best application so far to careful install and the excellent Aldler clutch used in the 690/701.

DIRECT ADJUSTMENT
I adjusted in roughly 0.03" of clutch pack clearance with a feeler gauge when the primary cover was still off. Reassembly, oil, then a dead engine test in neutral, rocking the bike back and forth on my ceiling straps. Then rocking in 1st. I could feel a slight drag increase. Backing off the adjuster screw only 1/5th turn produced more drag, showing how close I was to right on the adjuster. Then it was time for engine-on testing.

'FREE PLAY GAIN' ADJUSTMENT
Blipping throttle, gearbox in neutral. This one's still a mystery to me. In the video, note the Rekluse rubber band between bar grip and clutch lever end to put force on the lever. Blipping the throttle, the lever responded just as Rekluse says it should:


RIDE TESTING
Snicking into 1st gear I could tell there the clutch was live, but there was no RPM-dropping level of drag. Taking off slowly there was tiny delay to engagement. From there hookup was proportional to throttle until the clutch RPM reached lockup. Perfect!

The a test ride spanned a half a hour. Had the 4mm hex key with me, but I made no adjustments.

From the cockpit view, a ride video. I'm riding one handed:


WE HAVE JOY
SO pleased! Even the manual override function isn't bad. Quite stiff though, owing to the stiffer clutch springs. You normal folks not interested in revised controls schemes can throw in the Rekluse kit and just go ride. I'll do the left-hand rear brake next.

Another vid, a brief summary in the garage after the test ride.


DAY-AFTER UPDATE
I ended up dialing in about a turn on the adjuster screw due to parts settling in? Should be the other way, having to back out. Don't understand that. But what I did discover on the 701 was some slight benefit to starting to engage at a slightly higher RPM to reduce the feel of the engine pulsing at very low RPM. The 701 is, after all, rather lumpy in power near idle. That gave me the idea to ride the KLR today to see if raising the start-engagement RPM might reduce the KLR clutch tendency to judder starting off in 1st if a slight too much bit of throttle is applied. The 701 does not judder, but you can feel each TDC pulse more if the engagement is at idle RPM plus 1.
 
Last edited:
DISABLE/ELIMINATE ABS
I'm starting into my brake work and eye the ABS with suspicion, and would rather take all the hardware off. I already have both custom hydraulic hoses made and ready to go.

The first direct brake will be the rear, as I will plumb direct from a clutch master cylinder to the rear caliper. Earlier I bought the KTM ABS dongle to plug into the diagnostic port to disable the rear ABS. Apparently just adding a spacer under the rear wheel sensor (a nut about 0.17" thick) so it doesn't read pulses will do the same thing. He says it does not affect the front ABS:


A fellow in Europe published a spacer design and claims eliminating rear sensor pulses will disable BOTH the rear and front ABS and the TC:
Rear Spacer to Disable ABS & TC Both Wheels.jpg


Here's a link to the pdf:


This fellow with a 2020 690 says "delete the ABS brakes" (plural), along with the TC. Speedo was not affected, so we know that data is coming from the front sensor.

 
Last edited:
BIG NEWS! (for me, anyway)
Turns out the fellow in Europe who designed the sensor spacer was right. The rear ABS spacer, which positions the sensor far enough away from the slots
such that either no pulse - or a really weak pulse - is generated will have the ABS control not enable the front ABS as well as the rear ABS.

I did a couple of tests to determine he was right, with an additional test to see if removing the sensor far from any magnetic flux influence by the slotted rotor
would cause any problems, like generating an error code (it didn't).

TEST 1 - Pull the rear ABS pulse sensor out and zip tie it to the brake line:
Rear ABS Speed Sensor Pulled Away.jpg

For Test 1, the KTM rear-ABS-off dongle I installed months ago was left plugged into the diagnostic port.

RESULT: No rear ABS, no front ABS, and (assumed but not tested) no traction control (TC). There were no displayed codes.

----------------------------------------------------------------------------------------------------------------------
TEST 2 - Run Test 1 again but with the KTM rear-ABS-off dongle unplugged - as in 'no longer there':
KTM ABS Dongle Disconnected.jpg


RESULT: No rear ABS, no front ABS, and (assumed but not tested) no traction control. There were no displayed codes.
--------------------------------------------------------------------------------------------------------------------------------------------------

This result is what I have been aiming for! It's what I've wanted for MY bike, based on my skill level, my preferred riding venue, and the conditions I encounter.

The manufacturer allows allows us to turn off our ABS manually, every time the key is turned on. Then when the key is shut off, the system resets to ABS-on again. The manufacturer provides a dongle for sale to turn off the ABS independent of key on or off. I prefer going one step farther and having the choice of turning off the front ABS as well, separate from key on and off. This helps me as I don't have to remember to do it every time the key is turned back on. Given how many times that happens each ride, I'd forget, then get a surprise of the pulsing front brake lever and - at times - less braking power than I need, with both of those being a safety issue for me.

Do not interpret me sharing what I'm doing on my bike as me recommending that you do the same! I may not know you, your skill level, riding venues, and conditions. I'm simply re-sharing publicly available information as I work though my own bike for my own purposes. Let me say that again:

I AM NOT RECOMMENDING THAT ANYONE MODIFY THEIR BIKE AS I HAVE
 
Last edited:
Back from weeks of hammering myself on a property followed by the Sipapu trials event. I'M SPENT!, but still good for keyboard work and puttering about the garage. Time to re engage with the 701 project.

LHRB
First up will be finishing the left hand rear brake which has been stuck at half way through. The plan is to pull ALL the complexity of the foot brake hardware, capping the two ports at the anti-lock rear brake module. In that tight mess of steel and flexible lines behind the frame rails, I hope I can get access to all of that! If not, I'll seal off the open ends and wait until I pull the engine out later when I install the Nova Racing gearbox.

Anyway, after that the priority goes to powering accessories - like the new Garmin Tread.

POWER ACCESSORY WIRING
All my 'big' bikes have typically gotten two DIN 'BMW-style' power plug-in sockets near the handlebars, wired back to the battery with one fused cord. This was for my heated vest, air pump, trickle charger to-from other bikes, and any other power accessory, including USB to charge my phone.

For the 701 I'm going to update things splitting the functions between one DIN socket (circled in red below) in the form of this Powerlet kit PKT-042-48:
Powerlet PKT-042-48.jpg

...and two USB-A 'dongles' via a cheapo DC-to-DC buck transformer, the upper dealie-bobber below:
DC to DC Buck Transformers.jpg

...and a second DC-to-DC buck transformer made by Garmin to power the new Tread through the radio module (the lower kit). The Chinese unit lies about its capabilities of 5V 6A 30W, while Garmin's Taiwanese unit claims a more modest 3.5A while being substantially more robust in build.

After a bad experience with a Garmin V many years ago, I'm rejoining the techie navigation world with a much more sophisticated Garmin Tread Garmin Tread M-S, GPS, U.S., Refurbished. This is definitely a high-end GPS, with a two-way radio module and you can dynamically track your riding partners if they also have the Reach. No more losing of a rider problem in the middle of nowhere. The phone app connectivity and capability is also impressive. I was shown by a friend how to route plan on Google Earth, creating a KML file then converted the file to GPX files via a separate program, Kml2gpx. I first saw the Reach when eating lunch with the 'Great Burton', who is truly Johnny Cash's "I've Been Everywhere, Man." Burton has an enviable library of GPX files!

All this added stuff means tapping into 12V power, and given the 690/701 has a modern mess of wires, I'm seeking to 'sleekify' the install by taking advantage of a large gage SAE power cord tap to the battery (red):
SAE Power Accessory Cord.jpg

I'll just cut the SAE head off and solder/heat shrink all three accessories into one fused link well forward of the battery in that ample space next to the Rade Garage.

The Garmin Reach, radio module, mic, and ball mount... really every bit of it is quality and quite hefty. Adding more porky capability needs an offset. Hmm. I think its time to toss the lead-acid battery for a lithium battery for an instant loss of almost 5 pounds! I like the lithium batteries for their higher voltage (higher starter rpm), and much better long-term reliability. I went 6 years on a Shorai battery in a KLR, and swapped it for a new one before a long trip, even though the old one was fine. Other brands like Antigravity have a battery box sized more closely to the 701, so this time the lithium swap won't be with a Shorai.
 
Last edited:
TA DA!
I was finally able to put in about 7 hours of work on the 701. Big progress for one day of work! Since this step of de cluttering plus controls simplification was such a critical step to my long running, overall plan, this post documents the two in detail, with a video and pix. Enjoy!

Overview video:


The big enabler of simplification is the excellent Rekluse auto clutch for the excellent Adler clutch on the Husqvarna 701/KTM 690. The need for decluttering would be there - for some of us anyway -regardless, as I, and many a fellow high-skill and off-road-biased rider find ABS and TC (traction control) an unwelcome and not-entirely-predictable intervention between our well developed brains and skills and what happens on the ground. When I almost went off a fatal cliff a while back because the front ABS cut braking power suddenly too early, I realized then that elimination of ABS on my bike was critical to me staying alive and uninjured. I am in no way asserting that this would be the case for you and your bike.

After the discovery, based on info from the web, that simply removing the rear pulse counter from its swingarm mounting hole, such that it would be present in the system, but not count pulses, would disable BOTH the rear AND front ABS, and also the TC (traction control), I felt at liberty to start to roll-back the complexity, clutter, and the added weight of ABS. (Gosh that was a long sentence.) Of course when I sell this bike - if I ever do - I will make sure the buyer is high skill and have that buyer sign a statement saying that I fully disclosed my modifications and their implications, and that the buyer understands and personally owns the associated risks and responsibilities. But the powers may make riding fuel powered bikes illegal by then anyway, in line with Rush's song describing a freer and better world before the 'motor law.'

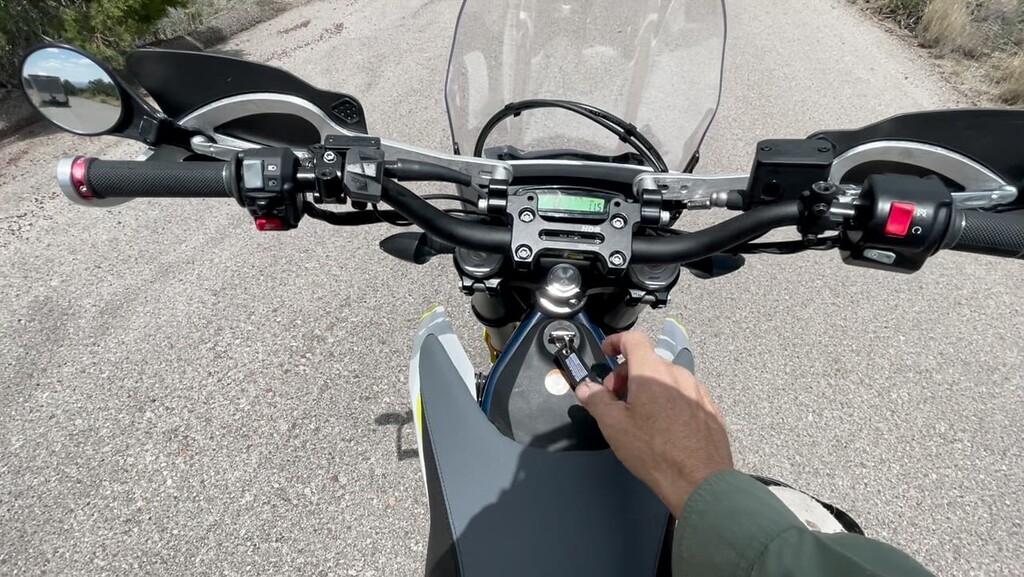
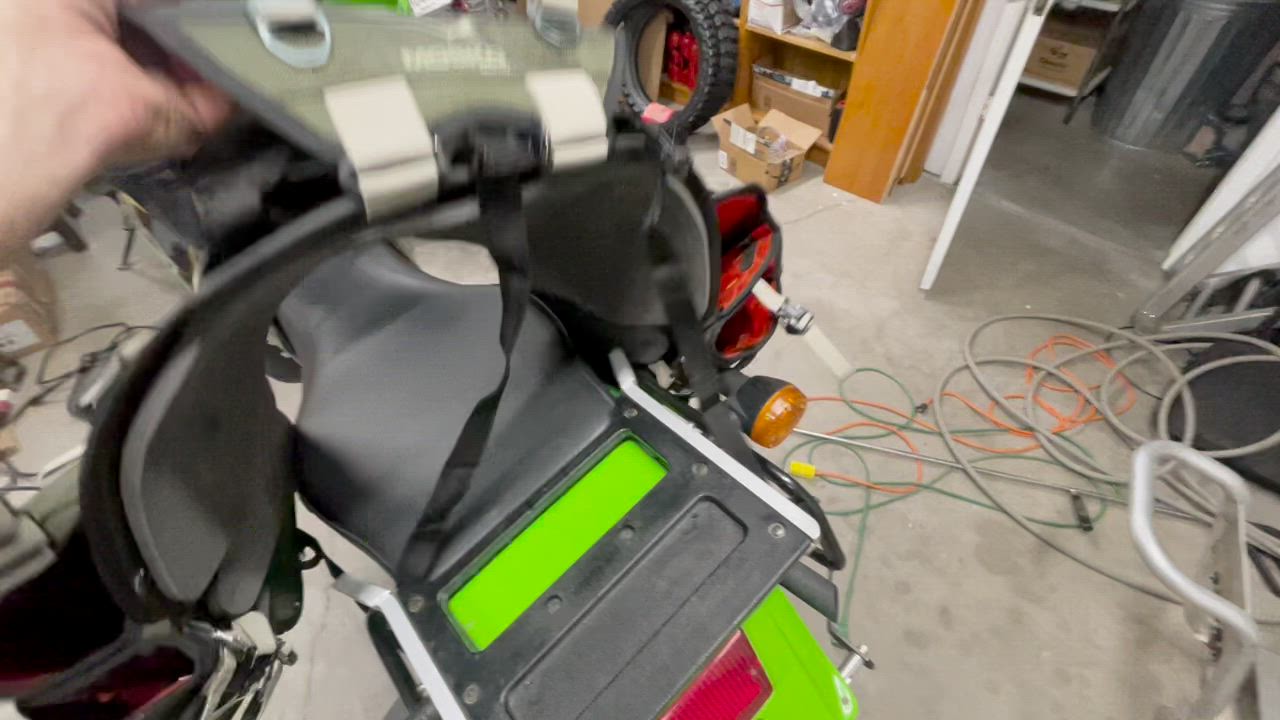
Yesterday's work resulted in less crap on my bike, and the right side of the bike in particular is cleaner looking:
Deleted Crap.jpg


Gone off my bike are:
- ABS and TC that I have to remember to turn off every time I throw a leg over.
The rear pulse counter and line, formerly running along the rear break line to the rear caliper now is now pulled up to under the seat and curled up near the battery. It needs to be 'seen' as still there by the ABS brain so the ECU won't 'throw a code' for faulty rear speed sensor. I do not know where in the harness the line comes from yet, as that wire harness branch or connector is buried somewhere in the fuel tank area. Some day I'll at least shorten the wire to tuck it out of the way better. And related:

- The map and TC handlebar switch
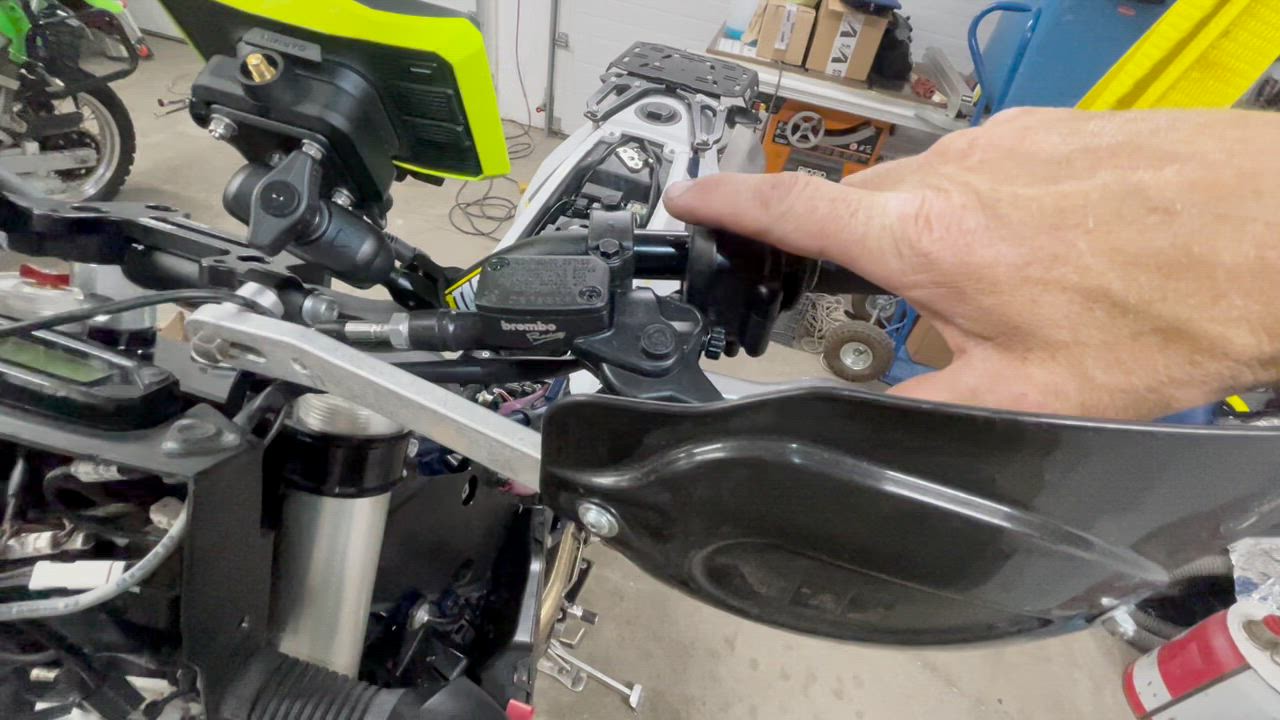
This push button and lighted switch set, formerly clamped to the bars, was in the way of the new rear brake clutch master cylinder, and is no longer needed, so I'm nesting it behind the headlight. After deleting it, the thing has 5 wires that do mystery things, so to not trigger codes I am retaining it for now.

- The Magura 11mm master cylinder, its hydraulic line, and its normally open (NO) clutch switch
The Magura is a DOT 4 master cylinder so it could have been served for the left-hand rear brake. But experience has shown the Brembo 10mm DOT 4 based clutch master cylinder ( in this case Brembo XR 01610) is right(er) for this application in lever feel and degrees of movement to full power of the rear brake.

- The stamped and slotted steel rear pulse counter disc
Don't need to count pulses back there any more, so it was deleted as clutter. The slotted rotor shares the rear disk T30 Torx screws, so it was just a matter of removing the slotted rotor and replacing the screws.

- Both of the rear brake hydraulic lines to and from the ABS module
I 'capped' the open ports with full braking fluid (just in case) with the banjo bolts cut shorter and a stack of banjo washers for full sealing.

- The foot brake assembly, lever, master cylinder, reservoir, and other associated bits
Now I can't mistakenly step on the rear brake when riding, and it's nice a clean not having all that stuff there.

So clean!
No More Rear Brake Pedal Assembly.jpg

No more rear brake pedal to bash and bend, and inadvertently step on when struggling in technically difficult places. Having a right foot on the peg, positioned correctly, for rear braking, is no longer required. No more sliding back when aborting a steep hill climb (when you can't turn out sideways to the slope) because the front wheel is unloaded and a locked front brake can hold the bike in position due the weight bias shift to the rear. On a standard-clutch bike, slipping the clutch is the backup rear brake, but when the sphincter slams shut and one is in mental overload, it's easy to get 'pilot overload' and forget you have that option. With hand brakes one can stick like glue to a steep when aborting a climb, freeing both feet to dab or for repositioning the bike.

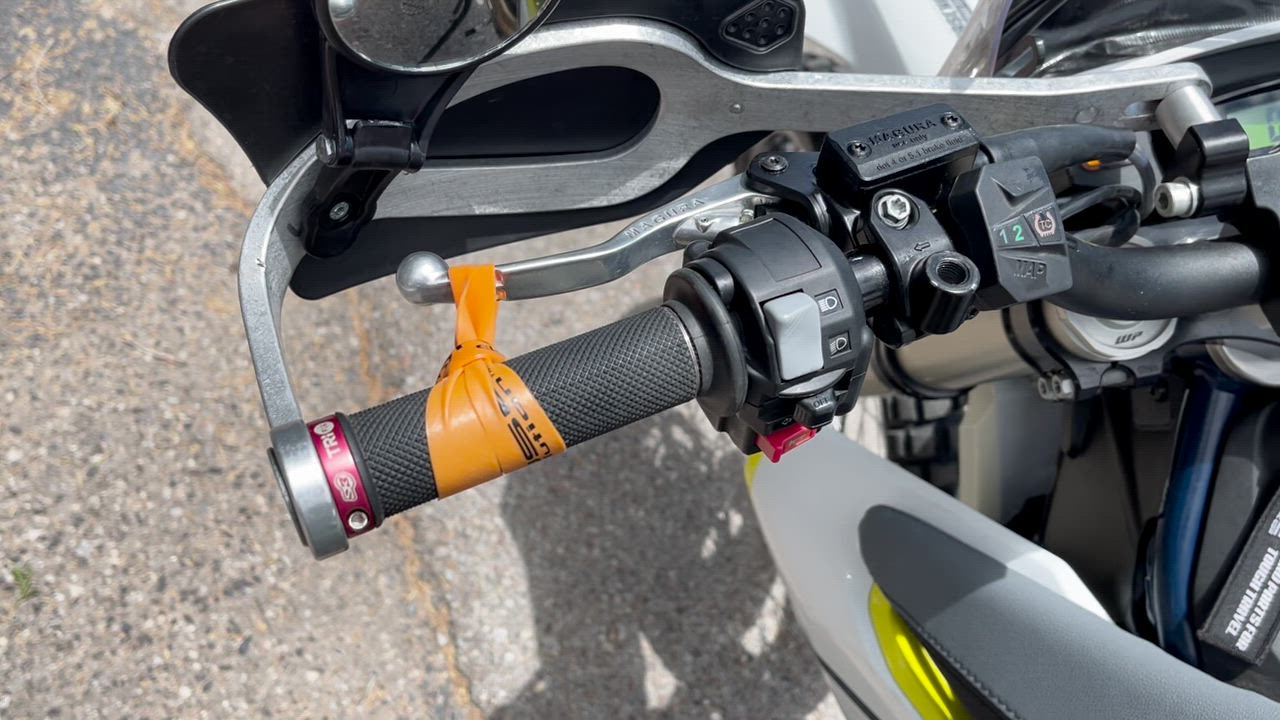
The new Brembo Master cylinder and custom Spiegler hydraulic line EL-1675-002-511-0075-320. Having now installed it, I'm changing the more ideal spec to EL-1665-002-511-0100-340, shortening the line a bit and lengthening the the protective sleeve on the swing arm just a bit. The M10X1.0 end of the Spiegler line at the master cylinder may require two instead of one aluminum crush washer. Check to see if the threads bottom out first with one crush washer. BTW I always remove the threaded extension of Brembo master cylinder and screw the line directly into the master cylinder. If you don't, the hydraulic line gets pushed too far toward the center of the bike. After removing the extension, check that no Loctite is left behind in the threads. I had top pick some of that out of this (new) master cylinder to get the adapter to thread in without resistance.

Note the ergonomic positioning with master cylinder farther in on the bars. I do that on my bikes anyway, for less finger force required, but in this case the position was required to have the lever adjust screw clear the switch housing at the small yellow circle:
New Brembo Master Cylinder in Right Spot.jpg


The Spiegler brake line takes the same routing as the former clutch line. It turns and goes down, resting in a groove molded into the wiring cluster enclosure (here shown pulled out away from the top triple clamp), affixed with a zip tie at the red:
Nesting of the New Spiegler Line to the Wiring Enclosure.jpg


The Spiegler line follows the old routing of the clutch line where it passes behind the plastic cover to inside the (former) stock airbox cavity:
Routing of the New Spiegler Line Same as Foprmer Clutch Line.jpg


Then in the cavity is follows roughly the same route, but I did not tie it to the frame rail:
Routing of the New Spiegler Line Same as Foprmer Clutch Line 2.jpg


Then it goes loosely around the cylinder head to aim in two curves at a pass-though on the right side:
Routing of the New Spiegler Line Arounf Left of Cylinder Head.jpg

...where the line passes through between the center case and frame:
Routing of the New Spiegler Line SA to Inside Frame Rails.jpg

Note how the line is zip tied down to the swing arm. That's to keep the line closer to the swing arm pivot and thus minimize movement of the line under suspension stroking. Note also how clean the right side of the bike under the frame rails now is. No more gaggle of ABS-related brake lines. And no more brake line mounting hardware and rear brake master cylinder reservoir.

Passing the Spiegler line banjo through from left to right side requires removing a bit of the corners of two prominences on the center case (orange). I used a coarse rat tail file. It didn't take much material removal, but the step is required to use the most ideal routing for the Spiegler line, which is the yellow area:
Passthrough Mod.jpg


Then back at the rear caliper the Speigler line and the parallel two-wire line for the repositioned break stop switch:
Routing of the New Spiegler Line At Rear Caliper with Brake Stop Switch.jpg
 
Last edited:
RESULTS
Everything worked as it should in the test ride! One more 'oh that was really cool!'
200.gif


The left hand rear brake proved one-finger strong, with the strength directly proportional to the size of the discs. Exactly as it should be.

With no manual clutch a slightly different technique is required for smooth upshifts: accelerate then chop the throttle to unload the gears.

As for downshifts, the 690/701 has 'quick shift.' A shift sensor on the outside of the primary cover picks up on a change of magnetic flux from a magnet on the end of the shift shaft, just inside the primary cover. Somehow the ECU knows to blip the throttle the instant you push down on the lever, which unloads the gears. The rider does not need to blip the throttle or use a manual clutch. Nice!

Just as with my other bikes converted with the simplified controls scheme, is more control with less effort by the rider and the bike. The Rekluse clutch allows retaining a higher of stock final drive without 1st feeling way too tall for 1st gear work. The taller final drive reduces shifting and at-speed intensity. If one is highly 'machine aware', riding habits will shift to a more relaxed way of riding to achieve the same brisk pace as with a geared down bike, with less frenetic shifter fanning. More efficiency means greater fuel range. You'll likely have to experience this directly to fully understand it.

An additional mod tested today was a clutch-switch hack. Just unplugging the connector got me to the normal won't-start in-anything-but-neutral mode. But liking that about as much as having a kickstand switch, and having the auto clutch, I wanted to be able to start the bike in any gear, any time. Closing that two-wire circuit full time does just that, and again, with no error code generated:
Clutch Switch Always Closed.jpg


With no more friggin irritating sidestand switch or clutch switch there's more:
200.gif

mental interruptions of 'what the...!'
 
Last edited:
MOSKO GNOME TANK BAG CUSTOM 701 IMPLEMENTATION
I fit the Gnome 'tank' bag to the 701, which of course has no 'tank' there. This unusual tank bag fits sideways to the rider and that works out well on the 701, as it is more dirt-bike oriented. I do not like the typical bucket-seat approach to many adventure bikes, as I feel trapped in place. Being primarily and 'off-road guy' having the condition, 'noassatall', I crave freedom to move all around on the seat, front to back and to stand without arm strain.

The Mosko Gnome tank bag fits the overall plan well, and complement the change to a standard height Seats Concepts ComfortXL, the huge XL lowered and reward-set Bosley pegs, and the KX-high bars nicely rotated forward. The Gnome does not interfere at all with a highly dynamic riding position and is just big enough to squirrel things away in the bag, with its unique two layered main pockets and small pockets. And as is typical to Mosko systems, more straps than you can figure out why they included them.

My install, left side:
Mosko Gnome Custom Attachment Left.jpg

Due to the heat of the pipe, I felt it risky to run the rear strap BEHIND the exhaust. Instead, I used the read M5 heatshield screw, hot melting a hole through the tough strap with a #1 Phillips screw driver. Though the strap is mount outside, I don't think it will interfere at all with my left leg/boot.

The right side install of the rear strap was 'cleaner' and on a slightly better strap angle. I used an M6 frame tab liberated by the the rear ABS rear brake line spaghetti. The tough end strap got a hot melted hole via a #2 Phillips screwdriver:
Mosko Gnome Custom Attachment Right.jpg


Removing the seat to get at the air filter and Rade Garage area only requires unsnapping the front two snap buckles then pivoting the bag up. Or I can remove and set aside the whole bag in seconds by unsnapping all four snap buckles.

- I did not use Mosko's universal front strap mounting because it was a very poor and problematic fit between the steering stem and wiring nest enclosure. The cross-snap buckles and main snap buckles interfered positioned as Mosko intended were also in the way of the upper triple clamp at the extremes of the steering arc. I used only part of their universal front strap, the main part minus all the other bits, ending up with a super clean install going under the frame tubes and in front of the ignition switch under the three plastic covers, all BEHIND the steering stem.

- I did not use Mosko's wide mid-strap of the bag, as it did not really apply to the 690/701. I cut is off long, hot melted the ends, then folded the remaining strap end back into the bag.

- I did not use Mosko's second, Velcro-attached grey foam pad under the bag because it did not allow the bag to conform to the front of the seat.

- I did use Mosko's two rear-facing straps. On the right to a former ABS brake line mounting point (M6), and on the left the rear heat shield screw (M5)

A video perspective of the various details:

 
Last edited:
LITHIUM BATTERY IMPLEMENTATION & CONNECTORS ANTI-CORROSION BIKE PREP
Why a lithium battery? They are longer lasting, have slightly higher starting voltage, and - here is the key selling point - they are MUCH lighter. And that helps offset the weight of additional installed kit.

Which lithium battery? I chose the Antigravity brand and ATZ-10 size as the case is the same size as the the stock Yuasa lead-acid YTZ10S. No foam pads required to fill in around a smaller case! The Antigravity reputation is good among the rider-vender community. I got mine from Slavens.

The lithium battery is so light that to weigh it I weighed it on top of the Yuasa battery. Here's the Yuasa at not quite 7 pounds:
Yuasa YTZ10S Battery Weight.jpg


And both at very close to 9 pounds. So the LiFePO4 battery is just a smidge over 2 pounds, which lops off about 5 pounds of lead and acid.
Antigravity ATZ-10 Battery Weight on top of Yauasa.jpg


Here was the stock battery area before new battery install. The the retainer plate is off and the ECU is swung up out of the way:
Yuasa YTZ10S Battery Area Before Removal.jpg


With the battery out I could remove the wasted money (see posts above) of the official KTM dongle (red), designed to keep the rear ABS always off. More clutter gone, and I could re cap the diagnostic port connector. Battery terminals had 3 taps each:
  • Bike ground, accessory power cord negative, and Power Commander negative
  • Bike, power, starter power, and accessory power positive
I retained this setup as all further powered accessories will be tied into the 10A accessory cord more forward of the battery.

Buttoned up with the LiFePO4 battery in situ, all appears the same. The only felt difference during install was the aluminum retaining plate atop the battery and under the ECU was a tad tighter fit vertically because the new battery is ever so slightly taller.
Antigravity ATZ-10 Battery Installed and Buried.jpg


As part of this general session of work, I finished the new bike setup of stuffing every electrical connector with silicone grease. Given I keep my bikes a long time, I want zero chance of a dry assembled electrical connector getting a little water inside to then start in with galvanic corrosion resulting in intermittent open circuits and much diagnostic grief. I finished up the tight nest of wires between the headlight assembly and the black plastic box containing that wire nest. The design of this area is innovative and smart. The 'black box' of wires has two screws at the top into the upper triple clamp and two pins than slid vertically down into the lower triple clamp. The headlight is then affixed into the black box with three screws, two on the left side (right in the photo) and one in the left side. Pretty slick:
Behind-Headlight Wiring Nest.jpg


There are some 6 zip ties holding groups of wires and other bits in place for a kind of organized layers effect. I took photos of the layers to try to stay true to the factory's developed organization as possible. That paid off as the headlight went back in without much resistance. This cavity of wires isn't sealed off from the outside world. Dust is allowed to get in there and over time, this will be a messy space. The previous owner had at least one particularly dusty ride, causing a coating of dust on all the wires. I pressured washed everything as best I could before working in there.

Thankfully I found enough room to move the 5-wire map switch/TC switch box and its clamp to the inside of the black box and away from being handlebar clutter. That's it, resting on the front fender. It fits nicely under and left of the headlight (right in the photo) without pushing the headlight out. Perhaps I can simply unplug it and remove it without triggering any codes? That's for later as the brain is more than busy enough dealing with all of the other bike setup issues.

In the upper-right corner of the enclosure (upper left in the photo) can be seen the three indicator light LEDs. One indicates neutral (green), check engine? (red), and the turn signal (blue). The LED 'bulks' are little circuit boards sticking up out of a molded rubber that has an annular prominence that supposed to lock into the white plastic tubes. But there's too little retention and the lights kept popping out of the tubes as I was working. I used a bit of silicone 1 on the rubber to help 'glue' them in place to prevent any one from jostling from rough terrain. It's just this sort of fine detailing that helps stuff to just work over the years and less likely to cause a problem. For too many riders, working on a bike increases entropy. Over the years I've built up a lot of experience so that heavily intervening in bike during a setup phases keeps entropy at least to the from-factory level, and in many cases reduces entropy.

A big goal for me when riding alone or with others is to plan and do in such a way as to have as few problems as possible - especially self-inflicted ones! I try to not need help so I can help when problems arise. Adventure can be what happens when things go wrong, but there are certain kinds of adventures I don't want to have. Decades a go I went on a group ride. One guy showed up on a POS machine and he himself was dripping with chaos. I kept my distance from him, but ended up working on his bike several times, sweating in the heat as others stood around with frustrated faces, neither wanting to be stopped, but also not wanting to abandon the guy to the buzzards.
 
Last edited:
SETUP FOR MULTI-DAY CAMPING
With the Mosko Reckless 80 and Gnome 'tank' bag installed in their final positions, time to move on to kit selection and where to pack everything. The process was more complicated years ago on the KLR,
as it was set up for the original-version of the Givi Monokey bags, and the purchased racks were highly customized for a better fit to the bike. Then I had a large amount of room on top for two layers of stretch net anchored to Bag Buddies and the little hole you see in the rear fender flares on the KLR below. Between this bike and my wife's former F650GS set up similarly, we could haul a lot of kit easily. Back then we were doing transcontinental riding and camping, almost always paved, some smoother gravel, and pretty much no off road. My wife just did not feel comfortable on the dirt. Part of that was the F650 single being a superb road bike, but feeling ponderous and squirrelly off road. She hated riding in sand! We sure enjoyed those long trips and finding fun hidden places to camp overnight.

I still have the KLR, which has always been more off road capable. It has very good suspension. RaceTech hardware in the forks, and a Cogent Moab shock on the rear. Over the last two years I tweaked it a little toward off road, but when fully set up with camping kit I did not like its weight. The 701 is for sure a more capable bike off road, but it's no light weight, and when I get it fully set up for multi-day camping I'll weigh it, and my guess now is it will end up at -75 pounds compared to the KLR with its multi-day camping setup. But there might be surprises. Heck, the very robustly built Mosko 80 bag assembly is around 21 pounds EMPTY.

In the more modern setup for the 701, the tension between two rules remains alive and well:

- Avoid the mistake of not taking enough stuff (misery camping)
This approach is preached by mostly younger macho men, who have a point. When I was younger I could mostly sleep when miserable. Not today!

- Avoid the mistake of taking too much stuff (misery riding)
No axes and kitchen sinks for me, but the weight of too much kit really sucks. Still, I bet most of the riders on that BDR will be on multi-cylinder blimps. Compared to them I will be a light weight!

Finding the balance on the new machine will same as always: work and testing. The latter keeps coming up short as I am running out of time before my ride. Still, with lots of thinking and doing, I'll get close, and will get in at least one burn-in ride before the BDR. Ideally I'll feel like I'm not riding a whale on the two two expert sections of the WYBDR, Bridges Peak and Woodchuck Pass. I've watched the videos of those sections, and they don't look that hard, but that was in the dry.

At this stage I'm collecting ALL my available kit to sort through it and make yes-no decisions. Pull all my crap to start editing, the KLR serving (with pouting face) as a shelf:
Editing Process Begins.jpg


Not in the edit pile yet is the Zenbivy Light sleep system, which I finally ordered yesterday after much study and dithering. I have had some miserable nights in budget sleeping bags sitting loosely on leaky inflatable pads, so I promised myself this time to not go cheapo on my next setup. Who knows, maybe with better kit I'll actually WANT to afflict myself with more camping-type riding? We shall see.

The Zenbivy system is modular:
Zenbivy Light Modular Approach.jpg


The 'bed' (left) captures an air mattress (third from left). Over those two go a 'clip quilt' (no zipper). I will use my own stuff sack or follow my very experienced friend Scott's methos of no stuff sacks, but rather, all related things packed next to each other in a dry bag.

I studied Wyoming's weather at various altitudes and locations for late August and decided on the 25-degree quilt on top of the 10-degree base. I can buy the 10-degree quilt later for colder camping.

More on this as it develops.
 
Last edited:
Top Bottom Back Refresh