What's new

Husqvarna 701 (KTM 690) Enduro (Dual Sport) Project Bike - Technical Thread

ACCESSORY POWER
Oops! There's a fly in the perfume of my 3-in-one solution for accessory powe: key-off parasitic draw.

Fortunately I found a factory +\- switched circuit labelled '10A' in the wire nest behind the headlight. Gonna tap into that for the two 12V to 5V buck transformers so they are dead when the key is off.
A vid about this little perturbation:


Had to cancel the order for the Powerlet DIN outlet kit, as it's not in stock. I ordered just the outlet PS-001, which should arrive soon.
Powerlet PSO-001.jpg

I use this type of 12V power outlet for my heated vest, air pump, etc.

I put power outlets within reach in front of me while riding. Not hidden away on the bike as is the case with BMWs.

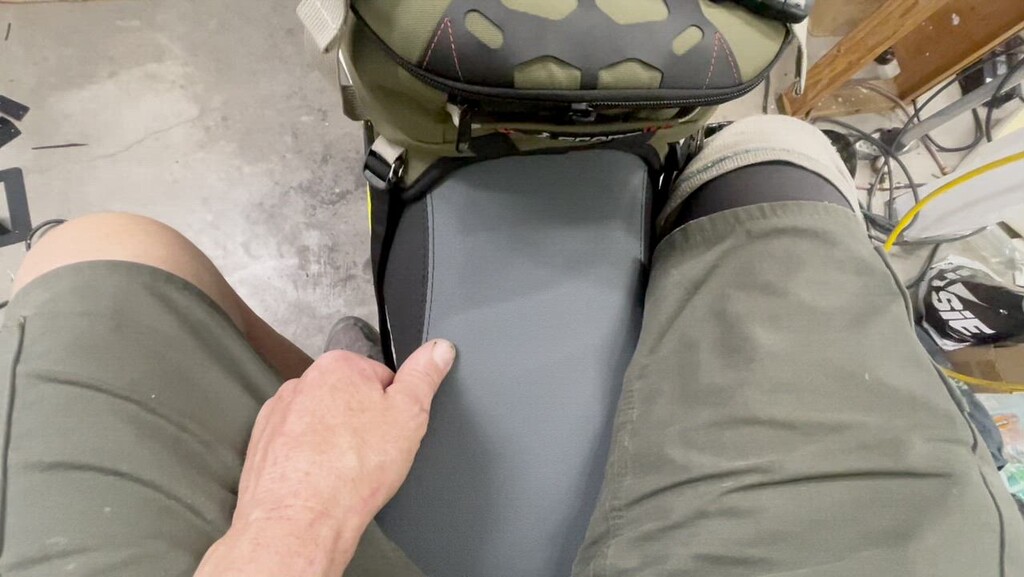
My original idea was to mount the outlet on a plate on the HDB handlebar clamp/plate, but the 690/701 unique design in the otherwise fuel tank area provides unique mounting options, such as in the pop-on & off plastic cover over the ignition switch. There might just be room to sneak it in between the Mosko Gnome tank bag and ignition switch in the blue circle:
Location of Powerlet.jpg

The more ideal bag location and a frame tube under the plastic cover may rule out this location, as I'd rather not have to position the bag more rearward:
Clearance for the PS-001.jpg

If it gets too crowded there I have another plastic cover option, in the plastic side cover (red). Either way a clean, simple, and accessible while riding.

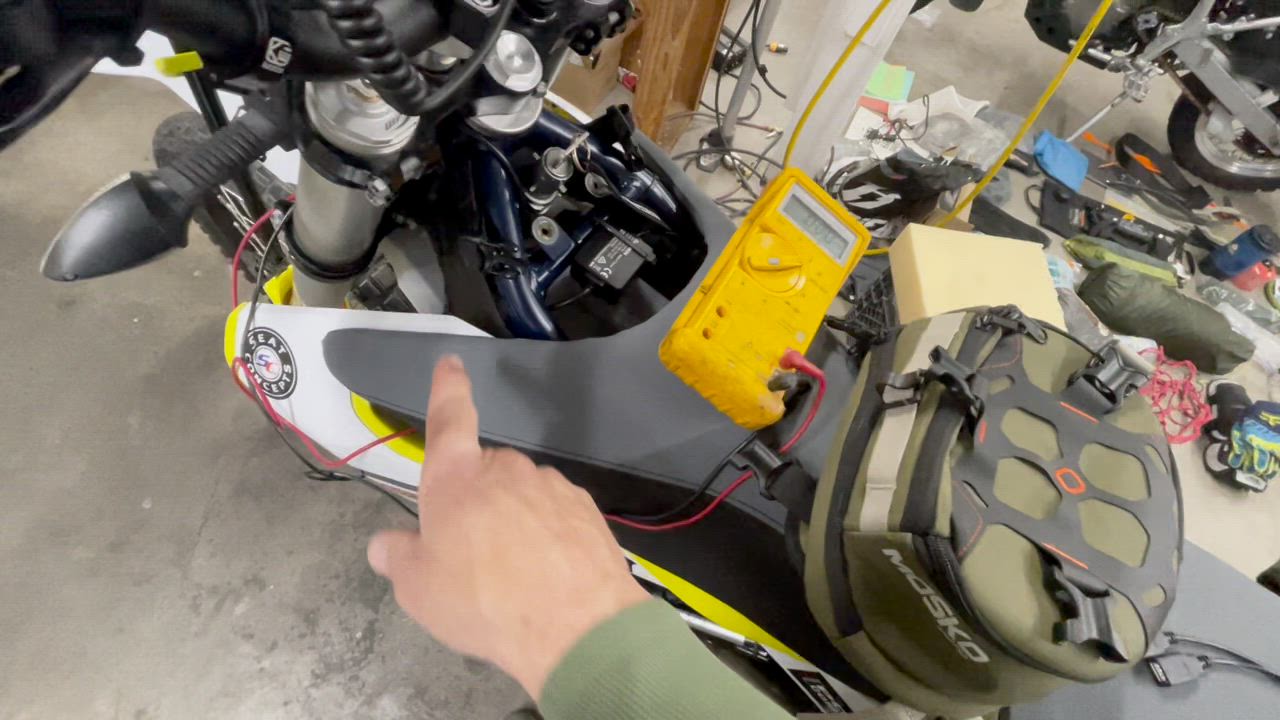
As for the two buck transformers, I investigated whether or not they will fit somewhere on the steering side. They will. There's room at the top of the wire nest box behind the headlight. Note how close the available switched accessory power is (blue). Oddly, the + and - terminals for the switched power are both female blade style. Some black sticky on the + terminal boot makes me think the previous bike owner used the terminals for something and was identifying the + terminal with black electrical tape:
Behind Headlight Room & Power for Buck Transformers.jpg

I should get this part done today. Note how long the output cord of the Garmin Tread buck transformer is (hanging down and coiled on the floor). This is because the Garmin Tread kit applies to in-vehicle installs as well. I was hoping to shorten the output inside the Garmin black box, but removing the four cover screws revealed a cover stuck fast... as though it was glued on or stuck to the internal potting. The USB A buck transformer cover simply pops off, revealing the simple electronics potted into the box:
Simple Buck Transformers.jpg


So my idea of splitting things up is working out excellently. The Powerlet outlet is in and in a very good spot. There is ample room for the buck transformers up front, and the cords are laying out well.

END RESULT

 
Last edited:
I'm thinking about getting a healtech thunder box to fix this issue, apparently it shuts down everything thats connected to it whenever the battery drops below 14v.
Currently using that ACC2 switched circuit connected to gps but dunno if i use aux lights and other stuff, 10A will be enough...
Parasitic draw seems minimal from what i've seen on youtube.

Enjoying this thread, keep it up
 
Muito obrigado por notar este tópico, Hez, e de longe é Portugal!

Healtech Thunderbox is an interesting concept. I'm looking at that now:
Healtech Thunder Box.jpg


I've added the latest detail to the thread just above.
 
I am glad to have a windshield, which came with the bike. The design is simple and nicely sophisticated. I was curious who made my wind shield. I found out by whom by searching images on Google under 701 windshields.

It's Bajaworx out of California. I have had windshields fatigue crack at the mountings before, and the fasteners/windshield mounting areas at the brackets look susceptible to the plastic fatigue cracks:
Potential to Fatigue Crack.jpg

Looks can be deceiving, however, and the design may be solid with no durability issues at all. This windshield is polycarbonate (maybe Lexan), and the shield that cracked so inconveniently was acrylic. If the shield runs smoothly through the air, it will last longer. If it gets excited and resonates, or is vulnerable to thrubbing by turbulent flow behind vehicles, it could eventually crack.

I sought to buy a replacement, just in case. That led me to:


...and the 'Dualsport Adjustable Windshield.'

The Replacement Parts link of the website directed to a skid plate :-0. The Contact link does not include a phone number :-(
Baja Worx Dualsport Adjustable Windshield.jpg


The shield came to me positioned on the mounting brackets fully down. So far that seems righter. The first time I rode the bike at night I could not see forward! The problem was the KTM headlight has an up angle on the top which was fluorescing the whole windshield. Stuffing my left hand between the shield and the headlight got me home. Next up a rag, but it blew out at 50 mph. After returning home, I came up with black Guerilla tape! A inelegant solution which will be revisited. For now it works for 'de fluorestation.'
Anti Fluorescence.jpg


Even if the shield is adjusted up some it will still fluoresce and impede forward vision. Maybe fully up it won't, but then I won't ever run it that high. I'm working on a cleaner solution.

I've heard that the number one rule of global adventure riding is to never ride at night! But when you have to it's nice to be able to see what's in front of the bike.

As for a different and more powerful (and heavier) headlight, that's not a priority for me. Having to ride at night will be the exception and I can get by with the tungsten bulb.
 
Last edited:
See the accessory power upgrades three posts above for a new video on the great result!

SUSPENSION UPGRADES
Made a decision on the forks. Still puttering around on the shock.

FORKS
I think the stock spring rate of 0.53 kg/mm is likely fine for now, unless the following WP kit requires different main springs other than the current stock EXPLOR 43.5 X ~460 springs. Racetech recommends 0.56 for my adjuster-by-rider weight 230 versus 180 pounds to include camping kit.

There are MANY aftermarket options for the stock OC forks, but I've decided to blow past them and pop for the WP EXPLOR PRO 6500 CC kit consisting of two closed cartridges with lots of rebound and compression adjustment in each. Will WP get the valving right for my unusual preferences at the get go with the 701 kit? Dunno. My hope is the base design will just be a lot better and the clickers adjustment range much wider, so they way they've spec'd them as is will be close enough. If not, they are pretty easy to work on and re valve.
WP EXPLOR 6500 Cartridges 2020+ 701 WP Press Release.jpg

Closed cartridges are better at reducing oil cavitation (microbubbles) for extreme pounding conditions like motocross with lots of jumps and whoops. Not so relevant to a 701. Back when I was testing the Betas to choose one, it was 2019. About then they got the valving right on both the open cartridge SACHS forks that came with my 390 RR-S and the closed cartridge versions I could tell were a little bit better. When valving is righter being open or closed in chamber doesn't matter so much. The report is these 6500-equipped forks are plush in general, so hopefully WP won't plug them up and make them harsher than they need to be.

After watching quite a few videos, I found out the cartridges will for sure install without having to pull apart the tubes apart. Some videos include the pull apart as a step to replace the seals in bushings, but in my case all that is new, so an install is very simple.

SHOCK
The rear stock shock spring at 5.8 kg/mm I know is under sprung. Racetech's calculator for the 230-pound equivalent (180 pounds rider plus camping kit) kicks out a 8.4 kg/mm spring, which is a substantial 33% increase! I wonder if I should go more moderate, say 8.0 to kit some average between fully loaded for camping and lightly loaded for motel-to-motel riding? The 8.0 is a spring rate percent change of 27. Camping versus no camping may require a change in preload. Changing the rear spring preload on a stock 701 shock is a royal pain in the ass because the frame tubes wrap around the shock. The following X-Trig product is reported to make adjusting preload very easy via an 8mm socket, eliminating the requirement to turn the big nuts.
X Trig Preload Adjuster.jpg

One fellow on YouTube broke the stem of the 8mm hex. He said it was working fine, then he washed the bike and later sought to change preload. He said he felt a lot of drag and apparently forced it and the stem of the 8mm hex snapped. That might have been an issue with dirt getting into threads and high friction from the component being assembled dry, as in without grease. The 701 being a very heavy bike thus has stiff springs. Dry assembly of this device would be a very bad idea.

As for what to do about the shock damping, still working on that. I have often just gone in and educated-guess re valved shocks by rearranging the existing stacks. A RaceTech Gold Valves kit would at least provide me a much wider range of valving options.

SCHEDULE
I'm hoping to add suspension changes before my August 20-25 (leaving 17 August) Wyoming ride.

The following section is a lot of blah blah, so feel free in your busy life to ignore it (as an engineer I can over document things :-)). It's simply a broad sweep of my A. B. Normal preferences.

PREFERENCES

Regarding the rider adjustments, spring, preload, and the clickers don't do so much good if the valving is far off of idea at the get-go. In the case of the 701, I have found the clickers to be pretty useless as they are full open. Even so I could not pound the forks down enough in my test ride to use the full 9.8" travel of the front forks. The red plastic rings showed only 8" of travel used. That's almost 2" of travel wasted. In general, clickers out of range are as useful as an air conditioning thermostat that prevents cooling the house. Clickers wide open should result in suspension that reacts noticeably too fast, and completely closed should result in the system being too slow. In between should be a wide range to accommodate a wide variety of venues and riders, including oddballs like me who like very active suspension. The 701 stock has long failed to do that. It's not that the suspension is terrible, but for those who know it's irritating.

My suspension preferences are well educated and refined by decades of learning, but they are admittedly not 'normal.' Suspension is like ergonomics, with better varying a lot by rider. 'Better' in suspension changes a lot over time (the suspension philosophy). Going back to 1970, I lived through the 'long travel revolution' perhaps the most rapid period of change in motorcycling.

My philosophy in general is a kind of fourth curve below between critically- and under-damped. Trials competition and custom suspension work being my main influencers.
Over Under Critical Damping.jpg


I'm big on a high degree of terrain response and rider input to the suspension. Trials, with its high body mass to bike mass, taught me a lot, some of it surprising and contra-intuitive, like in the case of the Ohlins long travel mod I am fond of, what led to better performance and LESS tendency toward felt bottoming was a significantly softer shock spring! That's a long story.

I'm also a 'fourth curve' guy in high terrain conformance in amplitude with respect to terrain frequency, as in a more ideal curve between between medium and small damping curves.
Amplitutde Response Versus Driving Frequency.jpg

...on the larger bikes as well.

What I like prefer may not be for the hard charging Pro rider who needs suspension to match pounding terrain. But I eschew the approach of a kind of 'high lift racing cam' approach to suspension, where the only time the suspension works awesome is WFO pounding. I and most riders don't ride that way. I like the bike to follow the terrain well and respond in time to my muscle and body mass slinging inputs. The stock 701 suspension tens to resist the rider and be harsh that it should be in high-frequency chop. I like to be able to bunny hop over a gap without needing a huge amount of throttle, clutch, and body mass slinging, such as is the case with the bigger bikes, slamming my ass down into the seat to load the rear suspension, to get the wheels to clear the lip of the gap.

Less responsive (over damped) suspension also makes a bike feel heavier even as dead weight (think mattress) feels heavier than a equivalent live weight. Technique matters more than the bike of course. It takes quite a lot of learning to ride with the bike instead of just on it. Better suspension just makes riding with easier.

The following is an example of good and poor technique and I suspect also wiser versus less optimal suspension settings.


Attachments

  • hqdefault.jpg
    hqdefault.jpg
    18.6 KB · Views: 6
  • icon_2_youtube_x16.png
    icon_2_youtube_x16.png
    237 bytes · Views: 4
Last edited:
GPS ACCESSORY POWER OOPS!
'Negative knowledge' is critical to good design as learning by doing sometimes teaches what NOT to do.

I had just finished with the heat shrink over the key-switched power junction for the two buck transformers when a friend with a 690 popped into the garage.
Buck Transformers Power On Switched 10A.jpg

I showed him what I had just done not a minute before and he says, "Burton says he powers the GPS so he can do route planning and setting sitting on his bike while other riders are getting ready to go." Nertz!

I'm not a key-on, headlight-on, engine-off kind of guy, and my warmup routine is to start the bike, wait 15 seconds, then ride off gently. I also don't sit for long periods engine idling. Turns out the Garmin Tread, when powered through the radio module, will boot up when the power is switched on. It also shuts down immediately when the power switched off. The onboard battery does maintain power on for a time and thus cannot tie it over to the next power-on. That's probably a good thing as I have heard the screen sucks a lot of power and forgetting to shut off power may drain the battery deeply, which is not good for it. Assuming of course there is no idle-time auto power off or sleep. I did not find that in the 84-page manual.

Additionally, the GPS has three irritating Nanny screens on boot-up: language select (twice!) and approving terms and conditions (bastards). I'd rather do that only once in a day.

So I must move the + tap for the GPS back to battery direct. I will do this by tapping into the line to the always powered Powerlet socket I put in the snap-n plastic cover, specifically at the yellow:
Battery Direct Power for GPS Tap.jpg

...running from there a wire forward and down a bit to an SPST switch which I think will be handy at the left side plastic cover (yellow).
From there will be a wire going (red) into the behind-headlight wire nest:
GPS Power Switch Location 1.jpg

...to where I snip the red GPS power wire (blue X):
Buck Transformers Power On Switched 10A.jpg

The battery negative wire is always on so that half of the circuit will remain on the accessory power circuit.

This change will have the GPS powered for the whole ride until I choose to switch it off. As for inadvertently leaving it on and running the batter down (don't know yet if the GPS has a sleep mode), with the screen still on I should know to power down the GPS?

HEADLIGHT SWITCH
A modern Nanny feature is headlights lacking an off switch (other than the key), so while I'm installing a switch for the GPS, I will also install a switch for the headlight low beam circuit. I do this on all my bikes so I can take the headlight load off line, when needed.

Here is the switch on my Beta 390:
Beta Headlight Switch.jpg


...and on my KLR 685 (yellow). Note also the two Powerlet outlets (blue):
KLR Headlight Switch.jpg


As for where to put the switch on the 701, I will either put it through the headlight cowling, similar to the Beta, which is visually more obvious:
Headlight Switch Location 1.jpg

...or through the wire nest box, which would be by feel only:
Headlight Switch Location 2.jpg

Headlight wiring: brown wire is negative, the white is low beam, the blue is high beam, and the green is for the little bulb.

Where I put the switch will determine the cleaner solution for were I jumper the white low beam headlight wire.
Through the cowling: the tie-in will go on headlight side of the connector (red).
Through the wire nest enclosure: near the blue X.
Headlight Switch Jumper Locations.jpg


To keep the throttle hand on the throttle, all switches like this should be activated by the left hand and thus be left biases or at least easily accessible.
 
Last edited:
ACCESORY POWER FINAL
It's done. Finally! Most of the work was inside the behind-headlight wire nest.

- The two 12V to 5V buck transformers are zip tied lightly in place to prevent bouncing around

- I am not using the + side of stock, key-switch-powered connector (yellow X) for anything, but instead am using a manually switched connection from battery direct to power the buck transformers for the Garmin Tread GPS and the two USB A dongles.

- A 12 gage THHW red wire comes from a soldered-in branch on the 15A fused + battery direct accessory power wire near the Powerlet BMW style DIN power socket I put through the snap-on cover over the ignition switch. It enters the box from the left side of the steering stem (bike frame of reference) and then curls clockwise to the solder junction

- The Garmin GPS power wire was shortened a whole bunch (blue tape on black wire) to about 6" with the connector right behind and under the GPS

- The two USB A dongles go back from the box on the right side of the steering stem (bike frame of reference) and the two heads are held into the Mosko Gnome tank bag by a forward small pocket zipper

- The headlight low beam circuit was switched to be able to manually control headlight power draw (light blue). The low beam wire is white from the connector to the headlight, but it is green before the headlight connector. I cut the green wire and soldered two 18 gage utility cord wires into the trunk. One in line with the wire, and one parallel and backwards so the tie-in is more compact
Wire Nest Final.jpg


The two new manual power switches are SPST, one for the headlight low beam and the other for the GPS and USB power are on the left side of the bike in easy reach by the rider. The headlight power switch had leads soldered to the brass terminals after the screw were removed, then silicone 1 insulated the terminals. The power switch for the buck transformers SPST switch has two ~6" wires instead of terminals. One wire was soldered into the wire trunk for the Powerlet socket, and the other was soldered in line with the red THHW wire.

A view of the two switches (blue headlight, red buck transformers):
Both Power Switches.jpg


A closer view of the buck transformers switch:
Buck Transformer Power Switch Close.jpg


Fortunately one of my three step drills happens to have a 0.465" 2nd biggest diameter, which is perfect for the switches. I set the threads with a little silicone 1 sealant for a Loctite effect.

I said yes to a Garmin Tread update when it was one. After that it started behaving differently in the start up screens. Maybe it will stop asking me for region and language on every boot up?

Now had this thread been on a more populated forum, someone would have caught and pointed out that it's not a good idea to put a GPS on key-switch power. Some day hopefully there will be more eyeballs on this thread.

I did not pursue Hez' suggestion of the Thunder Box, but kept the wiring and switching as stupid friendly (direct) as possible, but the Thunderbox would make a nice thread of its own.
 
SUSPENSION - FORKS
Yesterday I ordered the WP 6500 cartridges kit specifically for the 690/701.
WP EXPLOR 6500 Cartridges 2020+ 701.jpg

Note that with this kit the springs sit low on the cartridge. They provide plastic washers in various thicknesses that sit against the silver aluminum part above (far right at the 4-sided flange). They are quite picky about spring preload during the setup.

An Adam Chandler video on the kit steered me to Brandon, Cody, and Paul at Solid Performance in PA, (623) 561-1247. When the phone answered I heard 'WP suspension' in the automated reply, so I knew I was over the target on where to buy a kit. That they had two kits for the 701 in stock was cool. I bought one of them.

Coming my way is the WP 6500 kit for the 701, a set of fork springs, and a $35 tool to hold the cartridge rod against fork spring tension while the fork caps are screwed on. The 6500 kit is NOT cheap at $1,300. Adding in the fork springs and tool and shipping I think the total was close to $1500.

We had a conversation about customizing the damping and determined the best place to start from is the settings from WP. Fortunately the cartridges are easy to put in and get out for re valve, if WP errs on the side of plugged up like the stock forks. IF the quality of damping is there in this kit and the clickers bandwidth of range will satisfy my trials-distorted suspension preferences, I'll be good to go. I'd expect to have the clickers mostly open, but if WP backs me against a wall in compression or rebound to where I run out of clicks, I'll pull the cartridges and have them re valved, probably by AEO as they told me they have a 690 now in house to develop their own specs. They said they are interested in my feedback.

One fellow told me something interesting, that Graham Jarvis rejected the cone valve fork for a modified open-chamber fork because it was faster responding. I thanked them for that little tidbit. No surprise that Jarvis, a former world-level trials rider, prefers fast-responding suspension. I saw that in the video above.

As for the fork springs, I spent an addition $150 to get shorter springs at about the same stiffness as the stock fork springs. At first was going to stick with my stock springs, 43.5mm diameter X ~460mm long, but I got a callback after I ordered the cartridge kit saying the kits require shorter, 430mm-length springs, and when I gave them my rider weight 0.52 kg/mm was what came up.

I see contradictory info on what the stock fork springs rate is. Racetech says its 0.53 kg/mm and another place says its 0.59. The Racetech calculator suggests 0.57 for the open forks, but they don't sell springs stiffer than 0.54.

SUSPENSION - SHOCK
To go with the better forks I'm planning to re valve the shock myself. My usual educated guess in shuffling the shim stacks. Today I ordered a stiffer rear spring because I know I need one, but I'm going with a more moderate 27% increase to 8.0 kg/mm whereas the Racetech calculator says I should go all the way to 8.4 (33% increase). I don't typically like what stiffer springs do, but experience with my KLR, where I had to up the spring to ~ 7 kg/mm to hold the rear end up enough under camping kit, sways me on the 701 to stiffer, but not as stiff as what is called for. I hope an 8.0 won't prove too stiff and end up stink bugging the rear end and promoting a harsher response. I'll run very little preload, 1 to 2mm to start with, and go from there.
 
Last edited:
All my bikes have an always hot SAE plug by the left handle grip. It can powers the GPS, a compressor, or can hook up a battery tender. One at a time of course. If I want bike power off to the GPS I just unplug it. Simple as can be.
 
Pardon my ignorance, I'm curious as to why having a gps powered on/off with the key is a bad thing? Not meaning to derail a great thread however.
 
SLEEPING SYSTEM
Sleep doesn't come easy for me and anything that bugs me will keep me awake. So I went with the $$ and highly rated Zenbivy Light sleep system. When it came to sizing it, I didn't want to overdo it, and I thought that their Large size meant large. It doesn't! More like small to medium for my 6'1" lanky frame. I liked the design, so I'm returning the Large and getting their XL size, which should help a lot to prevent Zombie eyes open, waiting on a sunrise an eternity away.

The size is keyed off their air mattress size. Large is 25" wide and I chose 72" long. There is a 72" X 80", but had I chose that, it would still be too narrow.

During the test, my butt kept finding the edge of the air mattress on the sides and my foot was over the end of the air mattress on the end. I'm returning the 25" wide 72" long air mattress, the 25" 10 degree 'sheet', and the 25", 25 degree quilt. I'll hold onto the pillow.

Its replacement shall be the same model, but in the largest available size, XL, which is based on a 30" wide and 80" long air mattress. The + 5" on the width means the edges will be 2-1/2" farther out, and my foot should stay on top of the air mattress at 80" long (+ 8").

[UWSL]I made sure the wider/longer format would fit in my Big Agnes Crag Lake SL2, which as you all know, you can subtract half a person from any tent claim to number of persons. So at SL1-1/2, the floor area is 40" X 83". [/UWSL]

[UWSL]This is a fish-eye shot of the tent with no rain fly or foot print. The tent is actually much longer than it looks here:[/UWSL]
Big Agnes Crag Lake SL2 Without base or fly_.jpg

I like this tent. The poles are one unit with a swivel doodad in the middle. The color of the socket-strap in each corner tells you which way to lay the poles unit on the deflated tent. Very simple!

[UWSL]The XL Zenbivy Light will eat all but 1-1/2" at the ends and 5" on each side, but that's OK. The point of a tent to mostly to sleep, so I don't need a lot of floor area. What stuff I want by me off the bike can rest under the shadow of the rain fly.[/UWSL]

This time I'll go for the 10 degree quilt over the 25-degree quilt. Yes, I'll be too hot most of the time, but I can always throw the thing part way off. I found the 25 degree quilt to be on the thin side, so I decided to err on the side of not freezing when camping up high, as freezing, like having my butt go off the edge of the air mattress, is a for sure wake-me-up event.
 
Last edited:
THE FEEL
During my test ride recently, my wife showed an interest in coming along, so she threw a leg over. The really large pegs gave her just enough purchase to make up for lack of pillion pegs.

We floated around the neighborhood.
The totality of changes have the bike behaving butter SO smooth-efficient... and mellow when short shifting. I, of course, had to open it up to then delight in the digging in of finger nails with a robust scream when I open up the throttle.

All the work is definitely paying off. I have a bike name now: Super Yummy.
 
Gone for a week and poof! All this neat stuff arrived on the porch from `netland, from Solid Performance in PA, and Racetech in CA.

I also received the replacement of the Zenbivy Light sleep system, the XL size and a full refund for the Large size I found to be too small. I threw the bag-o-stuff on the scale. The 30" X 80" format of sleeping pad, sheet, and quilt is a bit bulkier and heavier at 7 pounds. The Zenbivy and the Big Agnes tent are are the majority bulk items in my kit. It's the price required for an older guy sleeping well - maybe - in the field.

As for the suspension stiff, here is that mess in one place:
230803 Supspension Goodies Received.jpg

There's the spiff WP 6500 closed-cartridge kit for the 701, with three tools, the center one still inexplicable, springs of a length to fit the 6500 kit (SOFTER than the OE fork springs at 0.52 kg/mm). The folks at Solid Performance stuck a tongue out and looked that up in a chart... commenting on how the CC kit is best with springs on the soft side. I choose this option I took a risk, skipping [UWSL]past all the no-doubt excellent OC multi-piece fork options. I also jumped over the excellent WP 'cone-valve' option and went direct to this relatively new cartridge kit. Drop in the two cartridges, boom done, and finger crossed WP didn't curse me with stupid setting choices that will require a re valve. I watched a vid on 2023 KTMs and saw that this kit is becoming a new standard item with a good reputation.[/UWSL]

[UWSL]Back when I was test riding every 2019 Beta to end up choosing a 390, the CC Sachs forks on their RR models were among the best forks I'd ever experienced. A surprise was their OC forks on their RR-S models were almost just as amazing, so I went that way to get the street legal kit. They have not disappointed. Hoping now this CC WP option works as the SACHS CC forks did. My goal today is to install the cartridges and put on the new Rallz front tire. [/UWSL]

After I encode how the 6500 cartridge kits generally behave over the reported wide adjustment range, I'll have a go at the shock re valve, fitting the 8.0 kg/mm rear shock spring from Racetech, made by Eibach of Corona, CA, part number is 0800.225.0450. This is a bit softer than what the Racetech spring calculator recommended, but I felt it necessary to try to compensate for camping kit on the butt end without getting too ride-height disproportional with the softer spring in the front end.

I also bought an dinky M5 nitrogen filler 'bolt' to ease charging the shock with a needle, which I have.

I'm running out of time as I will have to peel off to go camping with friends in a week, but I'll do the best to improve the suspension, keeping in mind I have yet to work out the details of my kit packing, and do a test run before I leave for Wyoming :-0

Meanwhile a friend's older 690 failed on him yesterday electrically, somehow, so I may be having to look at his bike as well.
 
Last edited:
FORKS IMPROVEMENT LEARNING EXPERIENCE
I hoped to install the 6500 cartridges Friday, but have been stopped by missing info and non-WP springs that are too small in diameter.

Three tools, two with inscrutable added bits with no instructions, and no info on recommended oil volume and spring length specific to the 701. The provided web link on a piece of paper in the box was a dead end:

www.wp-suspension.com/manuals

'Enter your product ID' and nothing I put in takes me anywhere. For one, I see no 'product ID' on the box, only an part number of 0761C141V002230, and no part of that yields anything at all.

I did locate a 6500 user manual, but not for the 690 & 701 'fork article number.' Silly fluff like the number of clicks for 'standard, sport, and comfort' settings isn't useful to me as I always start out testing at zero clicks, then max clicks, to bracket what the clickers can do.
Oil Capacity & Clicks.jpg

OIl Volumes non 701.jpg


As for recommended oil volumes, the 2019+ 690/701 forks are travel (extension) limited by shorter cartridges to around 35" (890mm) fork length versus 37" (940mm) fork length, which is what all of the above-listed models have. Regarding oil volume and the effect on the secondary spring (high pressure air), while the stanchion excursion is less, the oil starts out closer to the top of the fork. Maybe that balances out somehow, but I'd probably go for 360cc or even 350 to allow for use of all of the travel. If the system bottoms a touch easy I can easily add some oil whereas taking some away requires removing the forks.

It's interesting how little oil each of the CC forks require. It's almost half of what I found in my stock OC forks, which had around 620cc, each. Maybe too small of air volume is why I could not pound that last 1.8" of travel out of the stock forks? Perhaps the oil volume spec did not not changed after the travel was reduced?

WP provides a bag of different thickness spacers to meet the model-specific 'spring length' spec. The spring rate is determined by some chart for the application, whether general or specific to the model. I gave Solid Performance my body weight of 180 pounds and out popped a recommendation of 0.52 kg/mm for the springs. That's about the same as the stock rate, but I could not use the stock springs (top spring below), as they are about 2" shorter.
CC Versus OC Spring Lengths.jpg


The Solid Performance invoice said 'WP Fork Spring Set CV 5.2n X 465L'. What came in the 6500 box was the two springs under part number 91410119, with a number on spring of 052/08/15. The Solid Performance springs are very well made by someone, but they are smaller in diameter than the WP-made OC and CC springs. They do not slide freely over the bottom spring rests to the plastic washer. They could be made to do so with some drum sanding, but if they sent the wrong diameter springs I'll just exchange them.

WP's black plastic preload spacer snap-in diameter of the flanges are diameter 1.352", and the smaller diameter springs interfere with them by 1/8"! The spacers don't even fit the larger OC WP springs.
Solid Performance Springs Interference One Quarter mm.jpg


To help visualize the issues and learning experiences here is a video. Forgive me if I repeat things or just drone on too much.

 
Last edited:
The Solid Performance invoice said 'WP Fork Spring Set CV 5.2n X 465L'. What came in the 6500 box was the two springs under part number 91410119, with a number on spring of 052/08/15. The Solid Performance springs are very well made by someone, but they are smaller in diameter than the WP-made OC and CC springs. They do not slide freely over the bottom spring rests to the plastic washer. They could be made to do so with some drum sanding, but if they sent the wrong diameter springs I'll just exchange them.
The springs with that part number are 485 mm long WP springs for a cone valve fork and they should definitely fit the 6500 kit. The preload spacers are a fairly tight fit and should snap in to the springs.

The small bits that come with the tools are for hanging the tools on the "WP tool wall".
 
Thanks, Oldbear! I never thought to Google the part number to chase down the source. Hits from German speaking and Australian websites:
WP Cone Valve Forkfedern L485 5-2.jpg

Mainspring 43-2 52-485 Aus.jpg


This got me the nominal outside diameter of 43,2mm (1.701"). My set measure 1.650" (41.9mm) outside diameter, a manufacturing variance from the nominal diameter of 1,3mm (0.051"), which is a lot, and it accounts for the oops! of the interference fit with the bottom spring rest.

As for the black plastic spacers, they are SO big it is impossible to snap them into my cone valve fork springs. I can barely FORCE them hard into the larger diameter stock OC fork springs. The white plastic spacers I see in videos may be smaller in diameter on the flange and thus easier to snap into the springs, when the springs aren't running undersize.

A video on the general manufacturing of coil springs where you can see how the diameters can vary:


Now that I know by part number that these are supposed to be a no hassle fit, I can accept them and make them work by drum sanding the ID and cutting the flange off the preload spacers of choice.

As for testing the spring rate by force versus distance, but I don't have the tools to do that. I can get close by using a formula from one of my `80s engineering textbooks that calculates the spring constant by measuring the outside diameter, the wire diameter, a non-progressive coil spring's number of active coils, and the material's shear modulus of elasticity, usually that of hard-drawn steel.

k = G * Dw^4 / 8 * Dm^3 * NA

G is the shear modulus of elasticity (stiffness) of the spring material
Dw is the spring wire diameter
Dm is the mean diameter, which is the spring outside diameter minus the spring wire diameter
NA is the number of active coils

The formula works only for constant-wound helical compression springs and won't work for progressive-wound springs.

Here is what I got from the stock OC fork springs:
Spring Calculator - WP Fork Springs Stock OC in 701.jpg


...and here is what I got from the WP cone valve fork springs 9140119:
Spring Calculator - WP Fork Springs 91410119.jpg


The WP 9140119 are softer than the stock 701's OC fork springs because of the smaller wire diameter and the ~4 more active coils.
 
Last edited:
KIT
Back to working on the kit, in subsections of kit. I finally got the refund for the Zenbivy Light 25" X 72" Large and received the same in the 30" X 80" XL version, which fits in my Big Agnes Crag Lake SL2 (1-1/2 persons) tent with 6" left on one side. Very pleased with the quality and utility of the tent and sleeping system. They are the bulkiest category of kit.
Sleeping Bag in Tent.jpg


A video about the tent and sleeping system:


I wanted tent and sleeping system not scattered out, but rather stuffed into one bag. I thought the Mosko Stinger 22 that came with the Mosko 80 system would do. Below, the 22 with the air mattress and tent (peeking out), the 10-degree quilt and sheet won't stuff stuff down into the bag. Rats. I will try a bigger bag.
Sleeping Bag on Right Minus Air Mattress.jpg


An experienced friend savvy in minimal but adequate kit for multi-day camping emphasized bringing a tarp. He described incidents like his group getting caught out in heavy rain, and him and three other guys sitting under his tarp, strung between bikes with para chord. He described many other uses and I thought yeah, I need to bring a tarp. I wanted it to be more than just a sheet of plastic, so I chose the Gear Top, 10' X 10' tarp with strong eyes on each corner with two more eyes in between on each side. While a great tarp, it's 3 pounds and bulkier than the tent :-( It may get red X'd
The tent rain fly could serve in a pinch as a tarp, and a plastic sheet or a couple of large construction trash bags could do.
 
AIR PUMP
On my Beta 390 I have a CO2 cartridge kit to inflate tires in a pinch. On my 'big' bike a 12V air pump has proven handy, not only to air up tires but also my air mattress when camping. I have a good one I bought 15 years ago.

A video about the pump as I was checking it out and lubricating it.

My copper adapter I ended up ended modifying to press into the Zenbivy air mattress fill hole so I'd not need electrical tape to hold it in place.
 

Attachments

  • Cycle Pump.jpg
    Cycle Pump.jpg
    1.1 MB · Views: 7
Last edited:
Pardon my ignorance, I'm curious as to why having a gps powered on/off with the key is a bad thing? Not meaning to derail a great thread however.
Gravelcruiser, no derail is taken, and sorry, I just saw your reply and question from July 26.

My explanation of why above may have been lost in too much text :-)

Things like being able to sit on the bike key off and powered up not on battery is a plus, as is having it on for an entire ride despite powering down with the key, which I do often on rides.

I'm inexperienced in the modern GPSs like the Garmin Tread. After I updated the software I noticed the Garmin Tread behaving differently on power down, but I've not had time to use it enough to become fully familiar. I did get a glowing ride report from a friend who bought a Tread just before me. He says the Tread is SO much better than older designs. I'll see when I finally get to ride the bike more!
 
Last edited:
FRONT WHEEL & TIRE

Some blah blah on what I do to set up wheels and the tires I'm switching to:


The result on the front wheel:


CONVENIENTLY DRY
So many parts are assembled dry or under greased by factories. Why? Grease is messy in a production environment. Here's a great example of dumb, and most folks will never know.
Der assembly of the wheel spacer and outer wheel seal, with no grease in the air space between the seal and bearing. Shame!
The redish part you see isn't grease, it's the bearing seal.
Greasing NO - Dry Assembly.jpg


I got lazy and didn't pull the outer seal out then pop of the bearing seal to fully pack the bearing as well as the space between seals. But me only packing the outer seal space is highly protective against water or worse yet gritty slime getting into the space and then the under-packed bearing:
[UWSL] [/UWSL]
Geasing for Protection.jpg


Tada! Spacer back in it looks same as before... but isn't.
Greasing Done.jpg
 
Last edited:
Top Bottom Back Refresh