Nice- that hard skin is tough to work, i have a piece of mystery plate that I mounted a vise on. The flame cut edge is so hard only an angle grinder will touch it- so thats on the back side of the stand 
You are using an out of date browser. It may not display this or other websites correctly.
You should upgrade or use an alternative browser.
You should upgrade or use an alternative browser.
Milling & Machining
- Thread starter MVI
- Start date
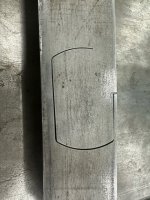
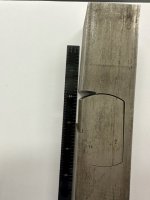
I had a 1.5 x 1.5 bar of A2 turn into a banana the other day from internal stresses. Cutting out a dog-tag type shape with wire EDM and heard the machine running in low power mode for a few minutes, went over to find it struggling to get back to its last position after a rethread. I'll try to remember to snap a pic. For those that don't know, wire EDM doesn't put any stress on the steel so this is just stress from the rolling process when it was made.
That's odd, usually A2 is pretty stable. Even more odd to have it banana on an EDM.I had a 1.5 x 1.5 bar of A2 turn into a banana the other day from internal stresses. Cutting out a dog-tag type shape with wire EDM and heard the machine running in low power mode for a few minutes, went over to find it struggling to get back to its last position after a rethread. I'll try to remember to snap a pic. For those that don't know, wire EDM doesn't put any stress on the steel so this is just stress from the rolling process when it was made.
I should say it's allegedly A2...I picked it up from a pile of old stuff in the shop and the ends are painted the right color to be A2!That's odd, usually A2 is pretty stable. Even more odd to have it banana on an EDM.
Edit to add: I just found 3 more bars of the stuff, all marked as H-13 so I'm guessing someone mis-painted it after saw cutting.
I cut out the section that was keeping it from flexing even more just to see how far it would warp.


Last edited:
I'm newish to all this and internal stresses causing lumps of steel to curl when machining never crossed my mind. Now I'm think it kinda explains some issues I've run in to before.I had a 1.5 x 1.5 bar of A2 turn into a banana the other day from internal stresses. Cutting out a dog-tag type shape with wire EDM and heard the machine running in low power mode for a few minutes, went over to find it struggling to get back to its last position after a rethread. I'll try to remember to snap a pic. For those that don't know, wire EDM doesn't put any stress on the steel so this is just stress from the rolling process when it was made.
You mentioned the rolling process. Does cold or hot rolled have an effect on this?
Both will do it. The only way to get around it is stress relive and annealing. Even then they will move if your take a lot of material off 1 side.I'm newish to all this and internal stresses causing lumps of steel to curl when machining never crossed my mind. Now I'm think it kinda explains some issues I've run in to before.
You mentioned the rolling process. Does cold or hot rolled have an effect on this?
Aluminum moves too. When we cut big cavity molds, we leave 1/16 on everything when roughing out. Then they sit for at least 24 hours. On a 20x20x14 mold, it's not uncommon to have a .005 dip in on the bottom side after roughing out the cavity.
psykown
Well-known member
I've got a new project a coming up machining 84"ish by 40"ish 7050 plate, I am dreading how bad thats going to be warping by the final productBoth will do it. The only way to get around it is stress relive and annealing. Even then they will move if your take a lot of material off 1 side.
Aluminum moves too. When we cut big cavity molds, we leave 1/16 on everything when roughing out. Then they sit for at least 24 hours. On a 20x20x14 mold, it's not uncommon to have a .005 dip in on the bottom side after roughing out the cavity.
Why aren't my vices the same hieght? Let's skim the table........

Hmm, maybe another 2 thou.

Little more.....

Close enough to finish the job.....
Today I pulled the sub plate to deal with the rust bubble.

3 years with no rust preventative measures is bad. Scraped, scotch bright, stoned, close enough.

Lubed it up and put it back together. I'll retorque it Monday morning in case it settles then do another skim cut.
I also releveled the machine with the sub plate off, it had settled a little.
Hmm, maybe another 2 thou.
Little more.....
Close enough to finish the job.....
Today I pulled the sub plate to deal with the rust bubble.
3 years with no rust preventative measures is bad. Scraped, scotch bright, stoned, close enough.
Lubed it up and put it back together. I'll retorque it Monday morning in case it settles then do another skim cut.
I also releveled the machine with the sub plate off, it had settled a little.
psykown
Well-known member
There is another machine comping out that does the same thing just a little different. I'll see if I can find it agian, it was in one of the mags at work.I don't know if there's competition using that process. The R&D data they're accumulating should be valuable.
psykown
Well-known member
I swear I wasn't drinking when I typd that lol, meant to say meant to say, " Watched it last night, I can't imagine the behind the scenes calculations they do to get the part actually made to spec!"
I'm pretty sure that little endmill makes a terrific racket when it cuts. They need a fricken laser attachment.I translated from the html. : )
The calculations for every variation in material and stylus only make it worse. They hinted at heating some materials for better plasticity, but didn't outright say they were working that into the process. I thought it was funny when the interviewer asked about cutting the finished part free from the sheet. That's probably the easiest thing they do.
This is the fence from my miter saw. Obviously impossible to actually miter anything with such a warped casting as a fence.

Not enough clamps + no flycutter= sketchy setup and using my boring head as a fly cutter 😁


Surface finish is meh, but the saw cuts accurate miters now!

Not enough clamps + no flycutter= sketchy setup and using my boring head as a fly cutter 😁
Surface finish is meh, but the saw cuts accurate miters now!
Danno
Well-known member
We are miling the end of a 700 piece 3x6 x20 ft order. We stacked 7 wide and 4 high...28 count times magical 840 bf for the loaders. 25 units. All hand handled and flipped for inspection. Wood is like gold prospecting...ya never know till you open it up. Been lucky to get 3 beams per log. And 0also have 3 logs and no beams. I think we are down to the last 200. For what...all we know is its getting shipped to the islands. Got 175 8x8 beam order lurking...making dust no doubt!
Finally scored a tailstock to match the 5C collet indexer, and a collet mount chuck to go with them both. The indexer provides 15 degree indexing for horizontal and vertical work, and a more convenient setup than the dividing head. Naturally I got all this put together after finishing the job which could have used them 
Phase II brand.. reasonable quality, but thankfully not a big $ investment.


Phase II brand.. reasonable quality, but thankfully not a big $ investment.
morsetaper2
Well-known member
I had this up on my Bridgeport a few years back 
Was leaking from the seal at the lower side of the tank where it seals to the lower "chair". Toilet was new in 1985 and the flush lever and the pot-metal bushing & nut were original and were severely corroded and thread seized on inside of tank. The hex disintegrated when I put a wrench on it as well. The curvature on the inside of the tank wouldn't allow a hack saw. Dicked around w/ a couple other destructive methods up to this point but no joy. So onto the Bridgeport to get the job done. Enlarged the hole w/ a drill then used an end mill to carve away the remains. Toilet runs like a champ now.


Was leaking from the seal at the lower side of the tank where it seals to the lower "chair". Toilet was new in 1985 and the flush lever and the pot-metal bushing & nut were original and were severely corroded and thread seized on inside of tank. The hex disintegrated when I put a wrench on it as well. The curvature on the inside of the tank wouldn't allow a hack saw. Dicked around w/ a couple other destructive methods up to this point but no joy. So onto the Bridgeport to get the job done. Enlarged the hole w/ a drill then used an end mill to carve away the remains. Toilet runs like a champ now.